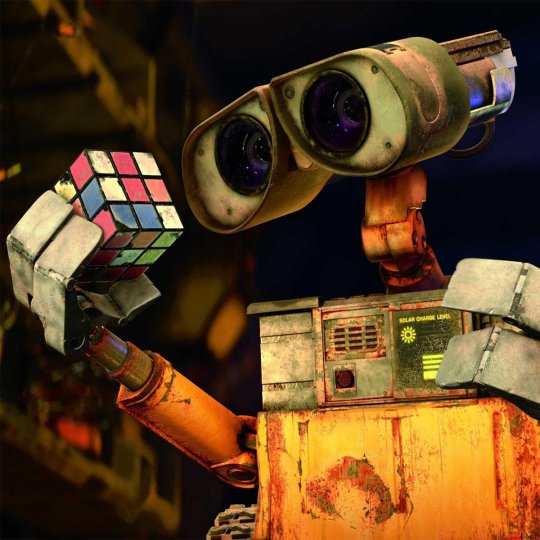
#i boosted the saturation but i might do some more adjustments
Explore tagged Tumblr posts
Visit Tumblr Blog
Explore Tumblr blogs with no restrictions, modern design and the best experience.
Last Seen Tumblr Blogs


Fun Fact
In 2020, 44% of users from Denmark used Tumblr daily.
Text

Id like to thank autism and sunk cost fallacy for getting me through this and also most things in life 55 cards down 30 something to go whenever the packages get here. Im free from the png mines until then

Now imagine this but im biting trading cards
#i will be getting some i-no robo-ky and bridget cards sooo i believe the only characters unaccounted for will be. slayer and zappa? sorry.#ive got em in a google drive… will share when i finish those next 30#but idk if anybody wants a peek at them i can send you the link.#i just wanna get More in there and also maybe fix these up a bit before going crazy…#i boosted the saturation but i might do some more adjustments#maybe clean up some edges. idk they dont need to be perfect also some of them cant be cuz this is. 20 yr old paper objects#theres some sloppy bits… but i like to think its charming… tell me its charming before i lose it#but yeah. most imperfections arent my fault. probably.#im rambling now. but thats okay too. i rambled a bit on call with my partner in yuri crime. i love rambling. im bad at it but its fun. yay#the kat goes meow#gg
13 notes
·
View notes
Note
how do you make your graphics? your style is so unique and beautiful!
Hi, thanks so much, that’s very kind of you! And I use Photoshop. If I’m being honest it’s not a super elaborate nor elegant process, I’m still learning and I mostly figured out what I like to do by just going in there blind and clicking around a bunch. I’ll put the more detailed steps under the cut if you’re interested, though!
Okay so generally speaking, these are usually the steps:
1. I take screenshots through either Premiere or the built-in Windows screenshot tool (but preferably Premiere). I try to use 4K remasters of the movies where I can these days, because it allows me to—
2. zoom in and crop the hell out of them and reframe them how I see fit without losing out too much on the quality. (these movies needed more close-ups, goddamn it) If there’s blank space left at the edges, I might duplicate the nearest edge area of the layer and try to blur it out + darken it with a gradient to fill that gap and still get the framing I want.
3. Then I adjust basics like exposure and contrast using the Curves function + boost saturation and vibrance—I try not to overdo it with the latter two because that step gets repeated later on, but I do need to do it at the start to even properly see what colors are in there since the MCU is so fucking bleak when it comes to color grading, and the 4k remasters tend to be even flatter. I also add Sharpen and Sharpen Edges filters here.
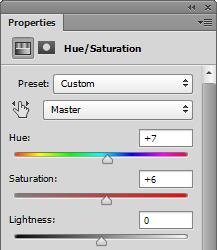
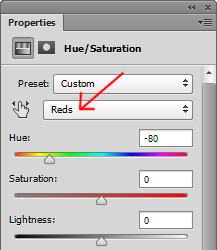
4. This is the fun part: go in and mess around with color. I usually use the Selective Color tool to figure out which parts I want to bring into focus by boosting like 2-3 colors and tweaking/evening out the rest of the tones to get some contrast. Hue/Saturation and Color Balance come in handy here, too. I’ll also sometimes use the Match & Replace Color tools to either neutralize, lighten/darken or entirely remove certain colors, and add Photo Filters to warm up/cool down the whole thing or certain areas.
5. When I have a decent idea of what I’m doing with color, I move to masking out what I don’t need—usually over-saturation in the skin tones, teeth, whites of the eyes, weirdly saturated pixel clusters, etc, and blurring out areas that might be too textured.
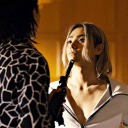
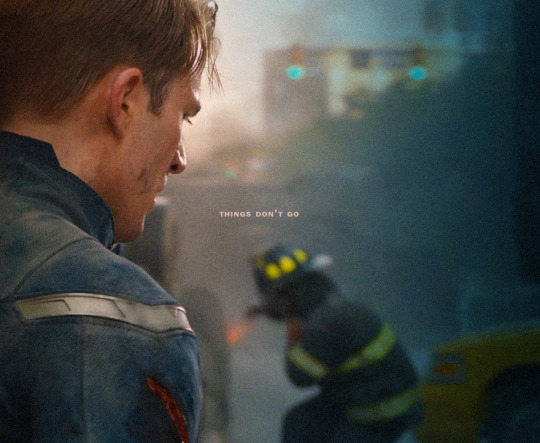
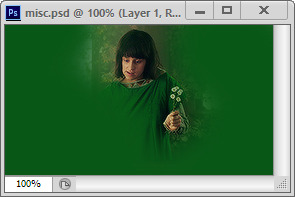
6. I’d say this is an optional step depending on the edit, where I might add any ��special elements”—this is not the best quality example, but it has multiple:

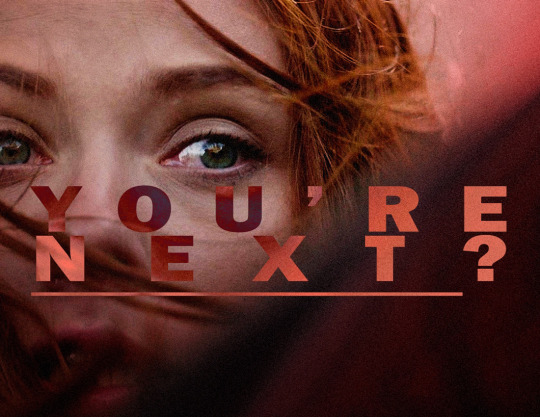
I take the rectangle select tool—or Lasso or whatever select tool, depending on the shape—and then use Invert on that area (which I do a lot, lol. Big fan of my buddy the Invert tool). Here I also used a B&W adjustment layer, but if the inverted area’s in color I go in again with Selective Color or any of the other previous adjustment tools to futz around with the colors some more, such as here:
I kind of suck at remembering to use different layers for different adjustments, but if I’m adding any shapes or patterns with the Brush tool—such as the dots or the blood spatter on those BW posters—I make sure to always do that on a new layer. I do the same if I’m adding a duplicated area at a lower opacity to create that “ghost” effect at the edges of an object, like in this Sam edit here:
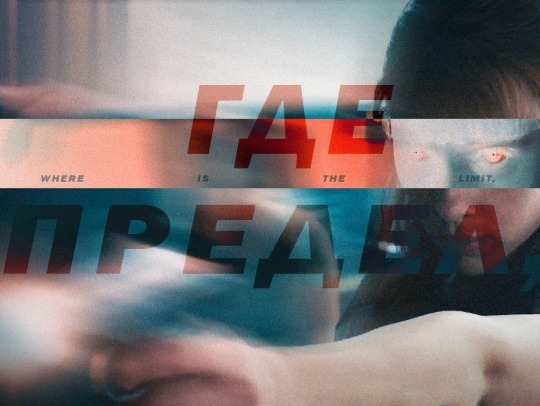
or if I’m adding a directional blur like in these:

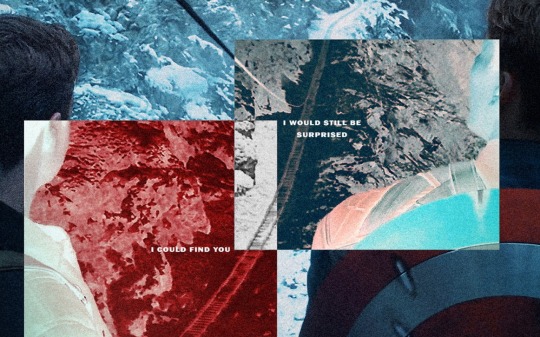
7. On a new layer, I add in color gradients at a very low opacity and then layer them up until I like what I’m seeing, usually radiating out towards the edges of the image or in spots that I feel might need a color change or boost. The red and cyan here are some of the more noticeable examples:
or the sepia-esque bleed through in these:


And I might do the same thing with a dark grey to darken the corners and edges a bit.
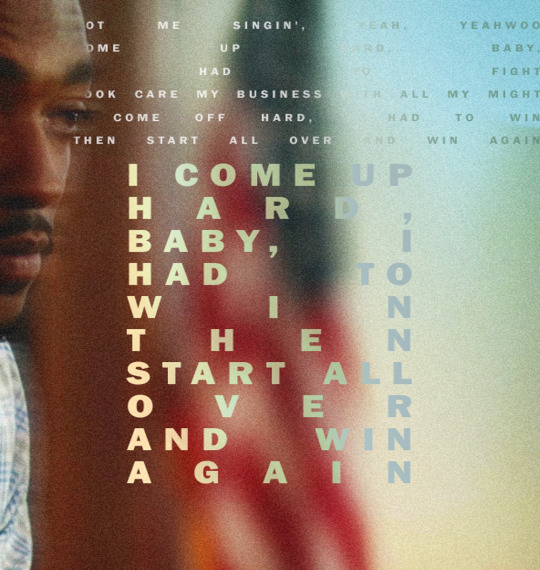
8. I add a text layer, write whatever it is I want on there and set font and size, pick a base color for it that is complimentary with the colors of the image, and then I go into Layer Style to adjust the opacity and blending mode. I usually use Difference or Exclusion for the latter if I’m trying to get that colorful text, and I might also throw in a lower opacity Gradient Overlay if I’m not a 100% satisfied with the colors that produces.
I might also mask the text so that I can make it appear to be behind an object, like in this:

9. Texture! I used to just add a noise filter directly to the base image but have since learned that’s not really the best way, so instead I:
i. create a new layer;
ii. set the mode to Overlay, and check “Fill with Overlay-neutral color (50% gray)”—you can also do this by just using the Bucket tool to fill this new layer with a neutral-looking gray color and then tweak the opacity;
iii. convert the layer to a Smart Object so I can go back in and re-edit;
iv. finally add a Noise Filter (set to gaussian and monochromatic) at around 3%-15%, depending on the image size and quality. I might also add a Gaussian Blur on top to make the noise a bit softer.
10. Final checks—this is where I might up the exposure, contrast, and saturation/vibrance again, or add another layer with gradients (always under the texture layer). I usually also export a test version to see how it translates online after it’s been compressed on upload, and then use that as a reference for whatever needs fixing or tweaking.
And that’s more or less it! Thanks for the ask—I never really thought too systematically about what it is I exactly do with these, so this was an interesting exercise. <3
4 notes
·
View notes
Text
@mourningstarred xxx

He looks ridiculous in that chair, stupid fucking pygmy meatball. She hopes he can smell the thousand years of accumulated fuck dribblings that have saturated every molecule of the cushion beneath his ass. Granted that Sera had not had this place deep cleaned in order to rid it of Adam's unique Fritos scented essence. She wouldn't know. Her time has almost exclusively been spent wallowing in the mound of blankets and fast-food wrappings that still stands like a shrine in memoriam the other half, or five fourths, of her soul.
Only when she's been staring at him with a vaguely offended grimace for a measure of time stretching into the realm of sincerely strange does she catch herself and bring a hand up to touch the bridge of her face in quiet irritation. She elects to ignore his question and pose one of her own.
"Do you even know what you're doing here? Is there some sort of plan rattling around inside that little, blonde head of yours, or are you just basking in the masturbatory bliss of finally being somebody people are going to remember?"
Being as it's the first time he's been through the marble doors of his late father's war room (well, aside from that one time he'd been invited to, unbeknownst to him, test a surprise attack idea featuring a net full of holy water balloons-) since Sera had quarantined the area for whatever secrets a Seraphim might want scrubbed that certainly wasn't his place to ask without rhyme or reason, he couldn't say if a cleaning crew had been through. Only that despite the unusual tidiness, there was no question that his father had spent quite some time in the area if the tiniest whiff of corn chips, however subtle, was anything to go off of
Another stretch of silence has him squirming under the guise of adjusting to a chair not quite suited for him without the boost of a few cushions- not that it would have been his first choice when coming to inspect the place, but it was the one nearest to her and she had looked for a moment like she needed a wing to lean on, fuzzy as freshly shampooed hair as his get with his lack of an oil care routine. If it weren't for the dutiful efforts of his exorcists, it's likely his father's feathers would have seemed just as bedraggled.
By the time she actually speaks, he's left blinking in bewilderment as if he's more shocked at the sound rather than what words form from it. "What I'm...doing?" The tucked talons droop and fold neatly, albeit uncertainly along the table's edge. A section of lip hides under a tooth as he chews on the thought, though not as long as she had. "Well, I thought I was checking on you being that you've sort of..." Wrist winding follows the swiveling of amber gaze to the ceiling just before snapping back to the scowl set across from him. "caused several rooms to need spare keys made? And no one has really seen you actually leave?? It's a bit-..." The insinuation is met with several blind sided blinks. "...much???" He really shouldn't be all that surprised. From what small conversations he'd overheard between those two, this feels...tame if anything. If not well thought out considering he's a poster child for one of the ten commandments.

"Uh huh...so, I think we've gotten off on the wrong foot." Said whilst finally escaping the deep pit of the chair by placing a boot on the table, then another until he's crouched nearby her elbow, robes puddling to resemble a roosting pigeon while hands smooth the fabric at his knees. "So here's both. Now that that's out of the way...how about we get out of this dark room now?"
1 note
·
View note
Text
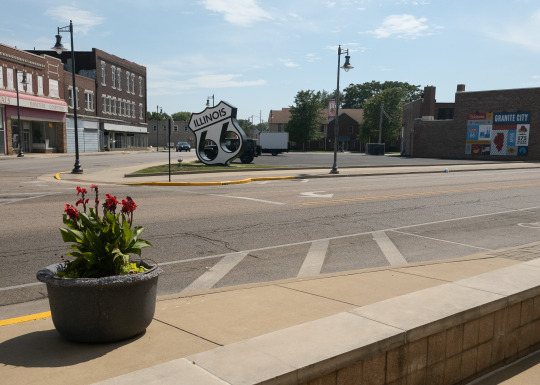
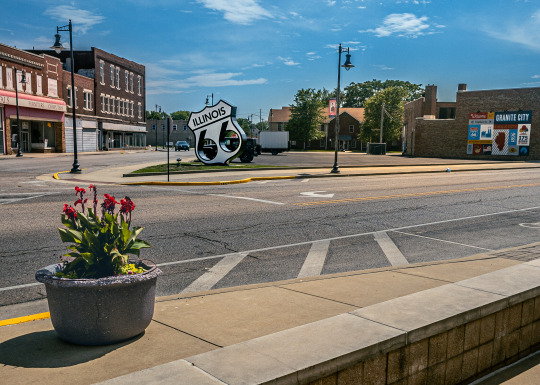
Image processing is an important skill to learn for photography. It is essentially the digital equivalent of developing a negative with film.
Not to be confused with image editing and image manipulation—which are also fun artistic skills you can learn if you want to get even more creative with your photos.
(Disclaimer: These are not standardized terms and different folks may use different terms and definitions to describe the same things. This is my preferred terminology and way of thinking about photo alteration tactics.)
Image processing is basically cropping, correcting exposure, adjusting the white balance, dialing in the contrast, and making sure you have true blacks and whites that span the entire histogram. You are taking the flat, low contrast RAW file (or JPEG/HEIF) and balancing all of the data to look similar to what your eyeballs saw when you took the picture. This can also include fixing minor blemishes, sensor dust, or schmutz/hair on clothing. Processing is typiclly done non-destructively in a RAW editor, so all alterations are changed in the metadata instead of changing the actual pixel information. You can undo any single change at any time without undoing anything else. When processing is complete, this can be your finished photo or a good baseline for editing.


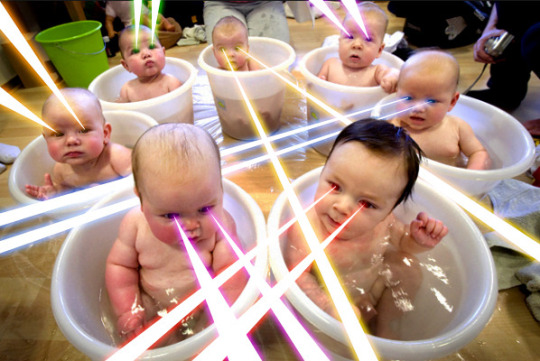
Image editing would be more creative adjustments. Maybe you want the sky darker and the foreground brighter. You want the colors to pop so you boost the saturation beyond reality. You want to add extra drama so you crush the blacks. Or you want to bring focus to the photo subject so you place a dark vignette around them. You are still working with the data you captured, but you are pushing that data more aggressively beyond what was actually seen in the environment the photo was taken.

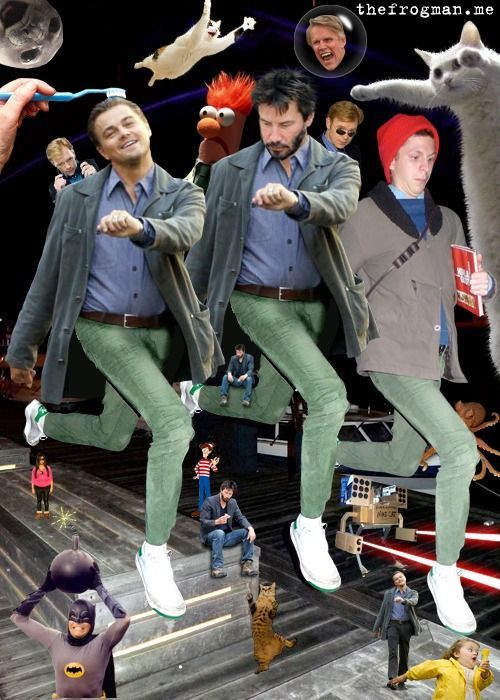
And image manipulation (often called photoshopping) is the addition or subtraction of data to/from a photo. Adding brand new pixels or erasing existing pixels to fundamentally change what was originally captured. This is called destructive editing because the changes can't be made only in the metadata. You can use layers and smart objects/filters to make it easier to undo individual changes, but it can be more difficult to undo a single change 20 steps back if you don't take proper precautions. Manipulation can include fixing larger mistakes like a light stand in the frame or flyaway hairs that weren't tamped down. Or compositing two photos together. Maybe swapping in a new head with a better expression. Maybe you need to remove a drunk uncle from a wedding portrait.
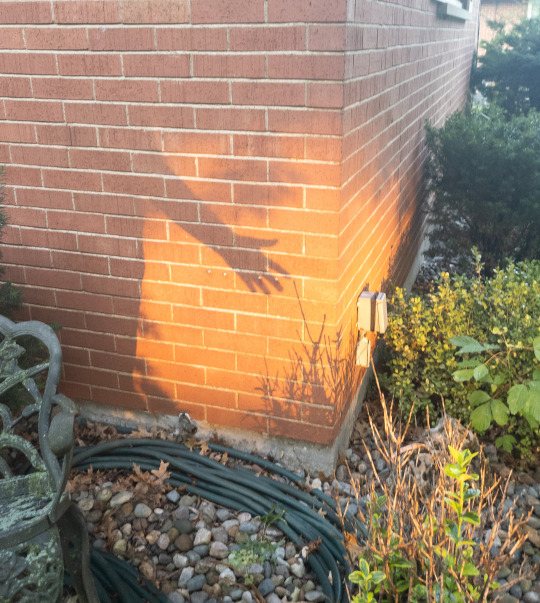
Or you can add a sleepy cat to a field of sunflowers.

The lines between these three levels of adjustment can get blurry, but all are valid skills to learn and can take your photography to new places. At minimum, every photographer should learn and understand how to do basic processing of their photos.
Now, you might hear some people say they just do "SOOC" because it is more authentic or naturalistic. They might even brag about how their photography skills are so amazing that no extra work is needed once they press that button.
SOOC stands for "straight out of camera" and it is a horseshit concept.

There is no such thing as an unprocessed photo.
Even with film photography, many professionals would choose special film to get certain looks and use special development techniques to push the photos beyond what was captured. One type of film might give more saturated colors. One type might give extra contrast. Choosing a brand of film was similar to choosing a picture style on your camera or a preset in your editing software. You could also "photoshop" film by dodging and burning—exposing different areas of the negative for longer or shorter time intervals.
It was all processing.
And if you take a digital photo... it is processed.
Even if all you do is hit the shutter button.
Unless you want to post a bunch of green photos on Instagram, you are not posting anything that is SOOC.

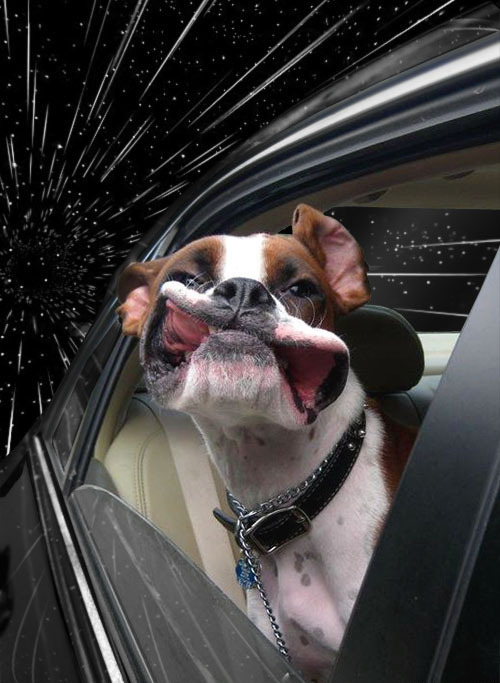
That top photo is the Bayer filter result before the data is processed with color information and "picture style" algorithms. A Bayer filter has two green pixels for every red and blue pixel, so the unprocessed version looks heavily tinted green.
So you can either let the algorithm inside your camera process the photo (which is fine), or you can do it manually in software such as Lightroom.
Either way, *something* is choosing the sharpness, contrast, saturation, and tone along with some other variables behind the scenes (sometimes referred to as a camera's "color science").
And if you think letting the robot inside your camera process your photo is somehow more "authentic" than a human being doing it... I feel you have things backward.
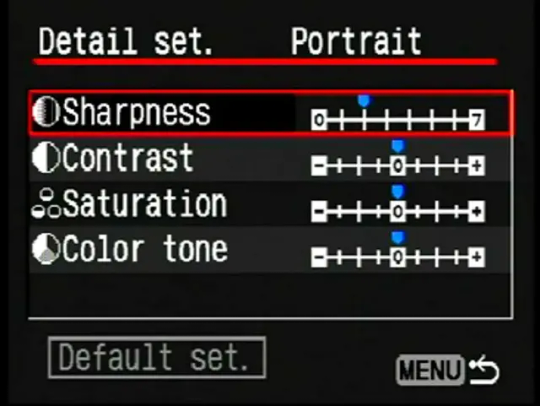
"Well, I use the neutral picture profile."
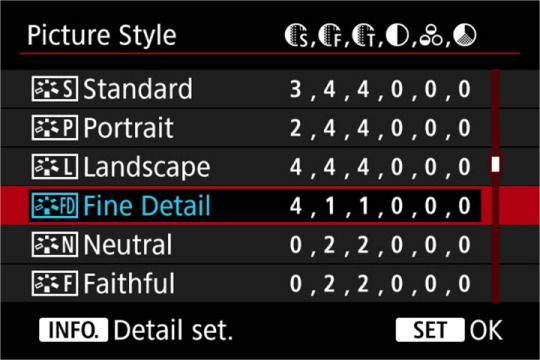
That is still an algorithm, friend.
A tiny robot runs around inside your camera guts and is instructed to not pull any lever, twist any knobs, or flip any switches that go beyond the predetermined 0,2,2,0,0,0 boundaries.
SO NATURAL!
There is nothing stopping you from manually processing your photo using those same boundaries. But when you do it yourself, you can account for variables the algorithm cannot. And a human being can almost always get a more authentic, true-to-life result than that robot playing with your pixels.
The truth is, almost every photo can benefit from some manual adjustments after the fact—even if you are going for a naturalistic result.
If you are happy with how your camera processes your photos, I am not judging or criticizing you. You can still get beautiful photos that way. Post-processing can be extra work and for some, takes away from the fun of photography. That is totally valid. I'm just asking people not brag that photos are more natural or pure or untouched.
Another common parlance in the photo education community is "get it right in camera."
I like this phrase a little better, but I still think it can be improved.
This mantra implies if you choose the proper settings before you take a photo, you will have less work to do later when processing your capture.
There is truth to that. And it is a fine goal to strive for.
But sometimes... shit happens.


People make mistakes. Cameras make mistakes. Or you have a smartphone with a plastic lens and a sensor that can fit on your fingertip and a bright sky and dark foreground is just a lot to ask of it to deal with.
One photo with perfect settings may not have captured that perfect expression that a different photo with botched settings did.
Or sometimes it is literally impossible to "get it right in camera." The environment may be too dark or too bright or both at the same time. Sometimes there are no settings that will get you the perfect exposure.
There is also a stigma against "fix it in post."
There is nothing wrong with fixing it in post. Some people are better at Lightroom/Photoshop than they are at taking photos and they are just leaning into the skill set they have more experience with. I have noticed this a lot with traditional artists that take up photography. It can take a while for their skill levels to match up.
Sometimes I will take a photo a certain way precisely because I know how to fix it in post. I will dramatically underexpose it to make sure I don't blow out the sky. Or I will take a photo that is too dark and another photo that is too bright so I can combine them later.


Or if I do not have time to dial in perfect settings, I will just use an auto mode and deal with whatever the camera gives me when I get to my computer. No shame in auto mode if you don't have the time or energy to do trial and error with manual settings.
And if anyone says "real photographers only shoot manual" you tell them to shut their gob.
In fact, anyone who starts any sentence with, "Real photographers..." is a gatekeeper and should be ignored.
If you take photos with artistic intent on a regular basis, you are a "real" photographer.
No other qualifications necessary.
The only time "fix it in post" is a problem is when your motivation is not in service to the best end result. Sometimes post-processing *is* the best solution. But if you are just procrastinating or you want to pass the buck to another person, you should try your best to summon some willpower and get it done properly.
The original intent of the phrase was to shame people who lazily shift the workload to others but somehow it morphed into meaning any post-processing is cheating or low effort. As if complicated editing is a button-press solution. Best practice would be allocating the labor to where it makes the most sense. You have to determine which approach will give you the desired result.
So if you don't feel like learning the fundamentals and just want to fix everything later rather than educating yourself, that would be a poor photography practice.
Or if you have someone else editing your photos or videos and you don't care how much extra work they'll need to do to "fix" them.
All that said... if "SOOC" and "get it right in camera" are poor expressions, what should the mantra be?
"Get the data you need to achieve your photographic goal." -Froggie
Okay, it's not exactly prose.
In my defense, photographic concepts don't always roll off the tongue.
If you are taking photos with artistic intent, you should always have a goal—an image in your head of the finished result. In the end, cameras are just data collection tools. If you know what you can do to that data and how it can be processed, edited, and manipulated, you can imagine realistic goals before taking a photo. Through practice, trial & error, and experience you will eventually learn methods to get the data you need. The methods used are inconsequential. Whatever works for you. Auto mode, manual mode, botched settings, too bright, too dark... eventually you learn if you have what you need even if it doesn't look right "in camera."
You can look at a photo preview and be like...
"I can recover those highlights"
"I have this great expression but I like the pose better in this photo. I can just move his head to the better photo."
"This will need a cat."
Photography is a minefield of gatekeeping, outdated thoughts, inaccurate expressions, poor understanding of technology, and just... bad advice.
But if you can navigate all of that, it really is a beautiful art form.
Whether you want very natural, true-to-life results...


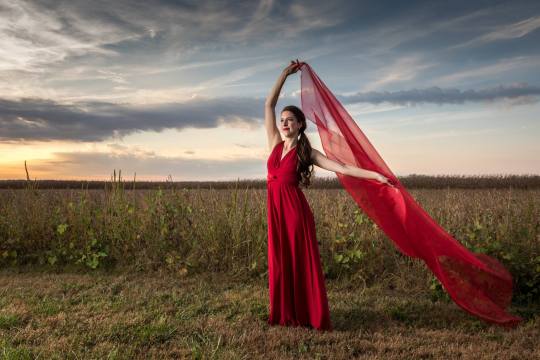
Or a photo needs just a little help to become what it was always meant to be...
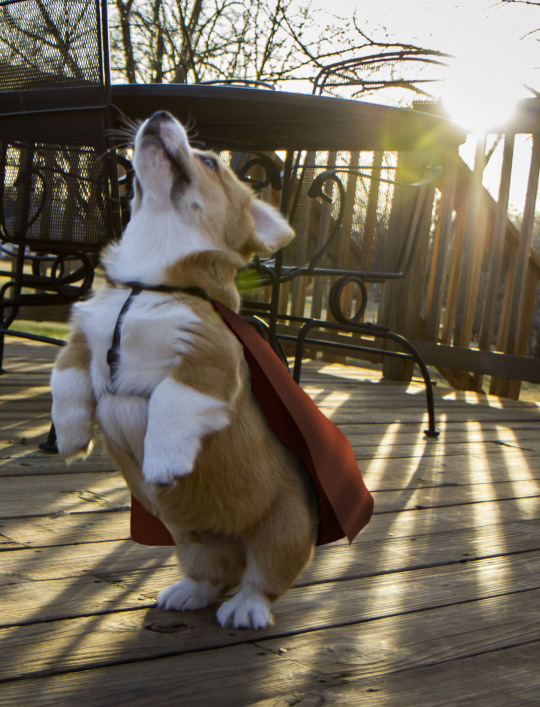
Or you want crazily photoshopped images that look nothing close to reality...
it is all valid and all wonderful.
So go forth, set a goal, and get the data you need.
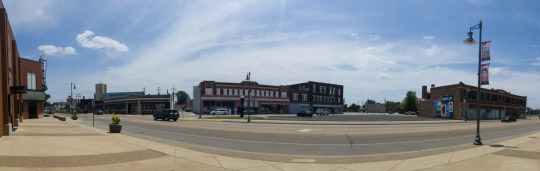


A while back on a post about a free photography course, a few people wondered if they could use their smartphone to practice.
And hopefully the above shows that you absolutely can.
Sometimes it takes a little post-processing to get good results, but that is the same with any camera. Though phone photos probably take me more than twice as long to achieve a finished product. Better cameras don't automatically make your photos better, but they do make getting good photos *easier*—especially in difficult lighting.
Many modern smartphones have a "RAW" photo mode with adjustable manual settings. Saving a RAW version of your photos allows you to continually learn and practice and return to those photos later on to re-process them with your improved experience.
A RAW capture has a lot more data than a compressed JPEG and gives you extra latitude in processing your photos. All of the editing done to a RAW file is saved in metadata instead of being baked into the pixels. So you can undo any individual change at any time without undoing changes made after that particular edit. And even if you save the file and close the program, you still have the power of undo when you open the file again.
With RAW you can more easily recover extra detail, lift dark shadows, bring back blown highlights, and restore color to blue skies that photographed pure white. (Often you can do that with a JPEG too, it just depends on the photo.)
The main downsides to JPEG editing are you can't non-destructively change the white balance after the fact, you have less dynamic range to alter shadows and highlights, and you can't make as many drastic edits before the image loses integrity.
A wise man once said, "The best camera is the one you have with you."
And a wise frog once said, "Shoot RAW and learn Lightroom because a human being can still outperform the algorithms of computational photography."
420 notes
·
View notes
Text
Coloring Icons from Uncooperative Screencaps
Someone recently asked me how I colored my icons for Superman & Lois, a show that has some pretty severe color grading (usually yellow). Every time they tried to brighten their icons, their subject wound up glowing, completely washed out, or tomato colored. I realized my answers to them might be helpful for other people dealing with screencaps that have strong color grading, so! Here is my guide to how I color the following icons.


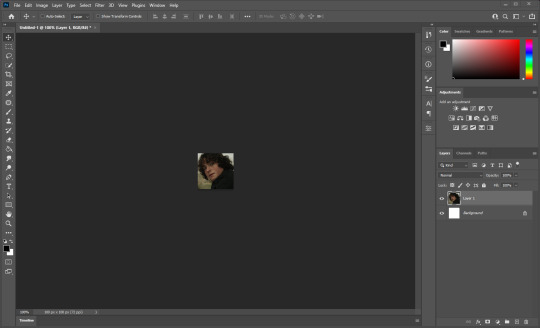
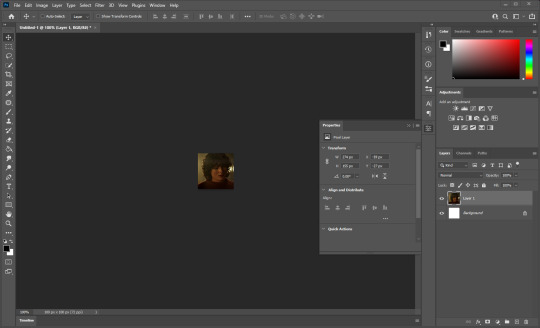
I always start by making a 100x100 Photoshop document.

Then I paste my image in and resize it to fit the way I like. (Use CTRL + T to resize your image and hold down shift while scaling to keep the proportions the same.)
Once I have the icon framed how I want it, the very first thing I always do is sharpen the image. When you’re working with something this small, sharpening just makes it pop. I use Smart Sharpen (under Filter > Smart Sharpen) with Amount 500% and Radius 0.2.


You might not see the difference in this above image, but trust me, you’ll notice it on your icon. Once you do this sharpen effect once, you just need to press CTRL + SHIFT + F and Photoshop will automatically apply the most recently used filter for you.
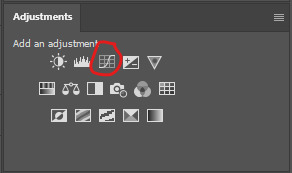
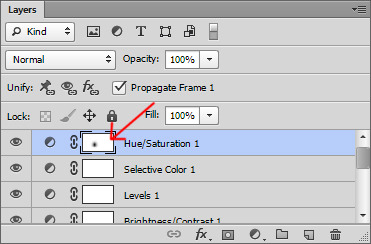
Now on to the actual coloring. All of my coloring is done using the adjustment layers, which are found above the Layers panel. These will add your effects as a separate layer that can be tweaked at any time, as opposed to the Edit menu which makes those changes permanent. (If you don’t see them, go to Window > Adjustments to make them visible.)

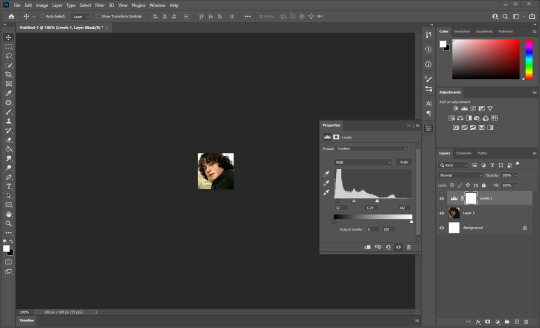
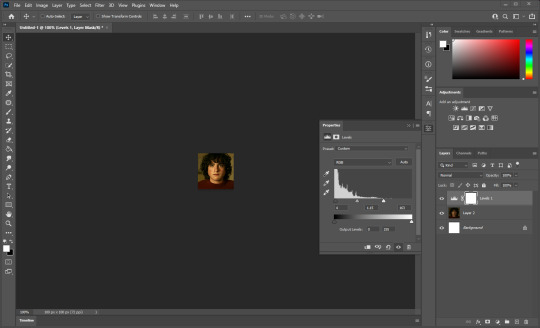
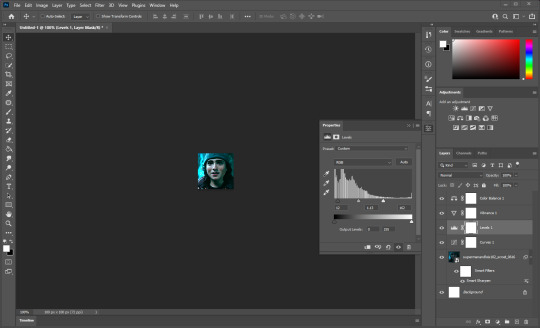
I always start with Levels, which is the icon that looks like a bar graph.

Click that and a new layer will be added above your image. This menu should also open. (Go to Window > Properties if it’s not there.)

You’ll see a histogram, which shows the approximate amounts of lights and darks in your image, with three sliders below it -- one black, one gray, and one white. The black slider adjusts the Black Point of your image, determining that everything darker than a certain value will display as pure black. The white slider similarly adjusts the White Point, making everything brighter a certain value display as pure white. The gray slider adjusts the midpoint between the two, making all the midtones of the image darker or brighter accordingly.
I always start with the black slider and nudge it to the right until the darkest parts of the image are looking nice and dark, but not so dark that the entire image gets lost in shadow. For this particular icon, with his dark hair and black shirt, that’s not very far at all.

Then I adjust the white lever to brighten the image. Because icons are focused on the face, I don’t worry too much about what happens to the background. I simply move the lever to the left until the person’s face is nice and clear without glowing or becoming completely washed out.
Then I bump the gray lever to adjust the rest of the image until it has the amount of contrast I want. For this image I want his face to be a little bit brighter, so I move the gray to the left a little bit.

That sets the brightness and contrast of the icon. Now on to Vibrance. I really like my icons to have a lot of color, and to accomplish that, I add a Vibrance layer. Vibrance looks like an upside down triangle in the Adjustments panel.
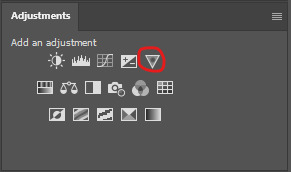
This will add another new layer above your Levels layer, and will open this window.
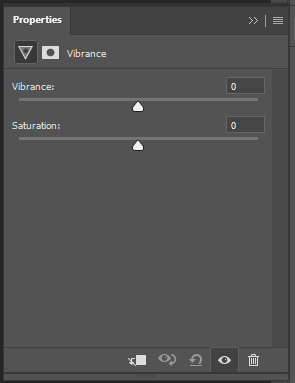
You have two sliders, one for Vibrance and one for Saturation. Saturation is fairly straightforward -- it boosts all of the colors in an image uniformly. Vibrance is a little bit different -- it boosts colors, but a bit more selectively, focusing on cool colors and colors that are more muted.
For almost all of my icons, I set Vibrance to 50 and Saturation to 10. This gives all of the colors a small boost, and the more muted colors a bigger boost.
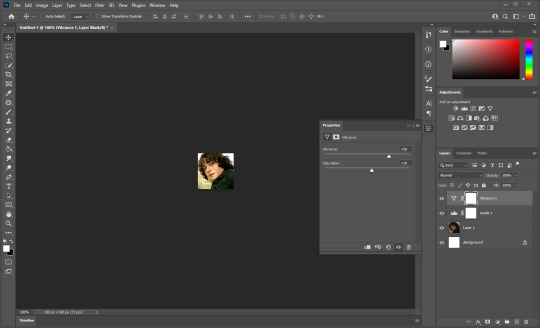
And for this icon, that’s all it really needs. The colors are neutral enough that adjusting like this didn’t knock things too terribly out of wack. Now let’s try an image that doesn’t play as nicely.
I start the exact same way. Blank 100x100 document, paste in the image, resize, sharpen.

Add Levels. Adjust the Black Point until the darkest parts of the image are pure black without the entire image being dark. Adjust the White Point until the skintones are clear without glowing or being whitewashed. Adjust the midtones until the contrast of the image is where you want it.
Add Vibrance. Set the Vibrance to 50 and Saturation to 10.

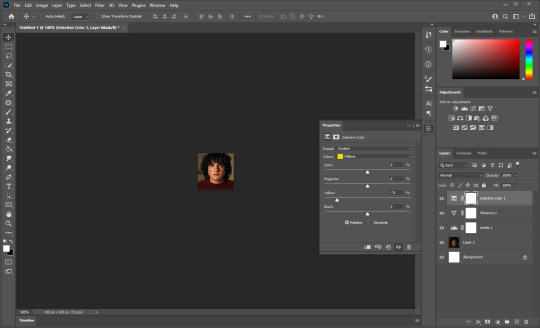
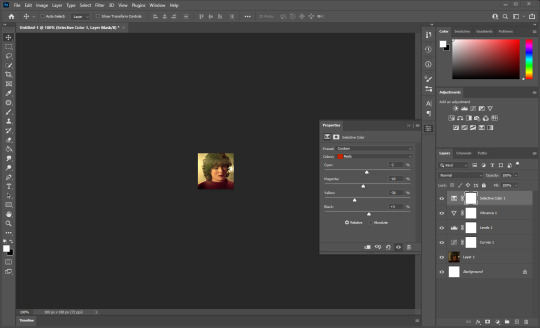
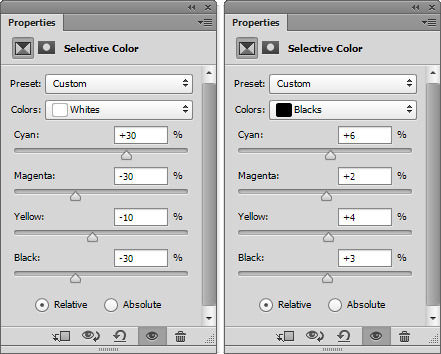
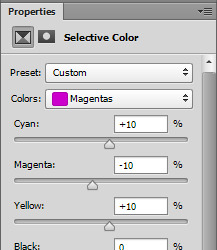
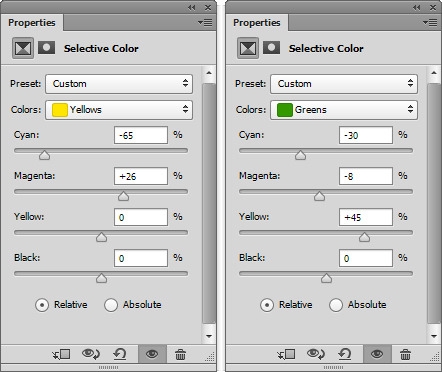
And... yikes, that boy is yellow. Sometimes boosting the contrast and brightness can make people’s skin start to turn funky colors. But we can fix this! It’s time for my best friend, Selective Color. Selective Color looks like a box cut into four triangles.

The Selective Color window looks like this.

Unlike Color Balance, which adjusts the colors of every part of an image all at once, Selective Color lets you target only a specific color range and adjust that. So for this image, I want to only affect reds and yellows in order to make his skintone look more natural.
Note the colors dropdown at the top of the window. It’s set to reds by default, but with this image we want to start with yellows. Switch it to yellows and move the yellow slider to the left to take out some of that color.
That’s already an improvement, but he’s starting to look too red now, also. Move the magenta slider to the left as well to balance that out. Be careful not to go too far, otherwise he’ll have no color left in his face and he’ll start to look ill.

This is much better. His skin is looking a bit too dark, so I’m going to move the black slider to the left a little. This will brighten the yellows of the image and therefore brighten his skintone a little.

That’s looking much better. For some images you may need to adjust the reds as well as the yellows, but this one is good as is.
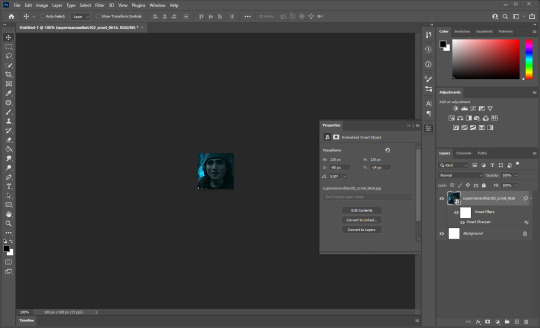
Last but certainly not least, let’s do a really dark scene. I’m gonna start with this base image.
Whenever I see that my starting image is extremely dark, the first thing I do is add a Curves layer, which looks like a wavy line going through a chart.
Curves can do some very powerful things for lighting in an image, but for this, all we really need is the blend mode. At the top of the Layers panel, there’s a dropdown that reads Normal. Open that and select Screen.
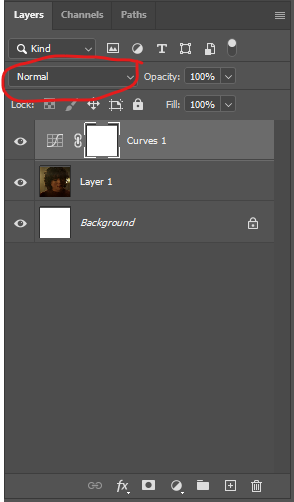

This will brighten the entire image without washing it out, as it leaves the darkest parts of the image untouched. It essentially gives a new base to start from, rather than trying to do everything from the dark original image.
Now we can continue coloring just like before. Add Levels and adjust as before. Pro tip: don’t fight too hard to make this as bright as the other icons. Just focus on making sure his face is clear. If the scene is just dark, let the scene be dark.

Add Vibrance and adjust as before.

And now we have a very orange boy. But we can fix this with Selective Color just like before.

And that’s looking pretty good.
And for one last extreme case, let’s do this very dark blue scene.
Again, I start with a Curves layer with a Screen blending mode.

Then Levels and Vibrance.
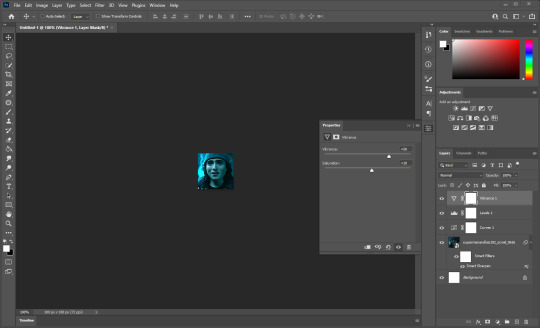
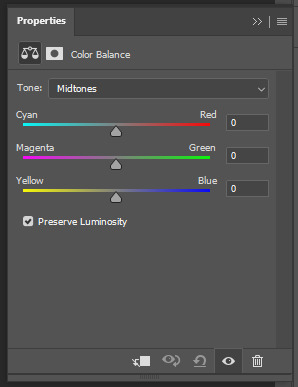
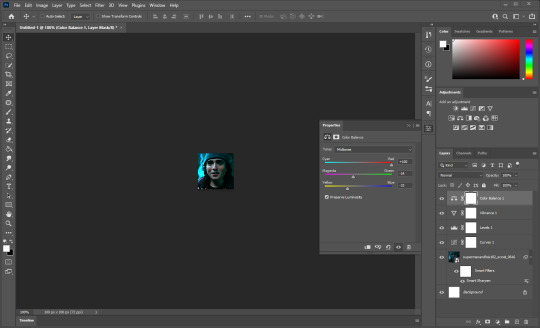
Now, in this particular case, it’s not the skintones that have gone wacky. The entire picture is just blue -- his skin, his clothes, the background, everything. So for this one, I’m not going to use Selective Color. Instead I’m going to use Color Balance, which looks like a scale.
Color Balance will open this window. While Selective Color targets specific color ranges, this will just affect the entire picture at once.
We want this to be less blue, so I’ll nudge the top lever away from cyan and towards red, and the bottom lever away from blue and towards yellow. This will take trial and error, so be patient with it.

Now some green has started to creep in, so I’ll nudge the middle lever away from green and towards magenta.
Now the colors are right, but the image became dark again as a result. So I’ll go back to my original levels layer and nudge the White Point and midtones up a little to compensate.
That’s looking pretty good. You could definitely nitpick more and push this one a lot further with other tools, but for a quick icon from a difficult scene, I think that’s plenty.
And that is how I color my icons! Some scenes are more stubborn than others, and occasionally this isn’t enough and I have to employ some other tools. But for the vast majority of my icons, those are the steps I follow -- Smart Sharpen, Levels, Vibrance, Selective Color. A Curves layer set to screen if the starting image is too dark, Color Balance if the entire scene has an extreme tint to it.
My one last pro tip is that once you set the adjustment layers for one scene, they should work for most of the other caps in that scene. You might have to make minor tweaks here and there, but the basic colors and lighting should stay the same. Just paste in your next image and add it underneath all of your adjustment layers.
I hope this has been helpful!
57 notes
·
View notes
Text
Wasting Your Time Ch.3
“Wh— what?” Tommy choked out, his voice hoarse from the lack of use all day.
The man rolled his eyes, as if he didn’t just ask a completely impolite question. “I said, do you have any booze?”
Tommy sat still. He reached into his jacket pocket, his hand finding only a plastic pen. Could he stab this man with a plastic pen?
Tommy pulled said piece of plastic out, visibly holding it up. “I have a pen.” Something about the bemused look on the man's face made Tommy click it, and again, repeatedly.
click click click click click click click click—
...
or; Tommy planned on dying. He meets Wilbur instead.
Chapter Summary: Tommy is wrong. Wilbur tries to teach him color theory.
cw for suicidal ideation
Tommy was not proven right.
In better words, his thesis, his argument, it was wrong. He was wrong, okay? He could admit that! He was wrong and Wilbur was right. Wilbur, him, and his stupid antithesis. Wilbur got the good grade, Wilbur got the pat on the shoulder from the teacher. Tommy got credit for participation. Tommy got a pity smile and a gold star sticker and a ‘good job! You tried!’
Tommy should be happy. He is happy! He talked to Tubbo and Ranboo. After they were all done with classes on Friday, because Tommy had waited that long— he talked, and they listened! They did!
“ Would you guys be happier if I— I don’t know. Stop hanging around you, or something?” He was picking at the thread, pulling it so tight he could feel it move the inside of his sleeve.
The answer he got? They said no. Ranboo was quiet, letting Tubbo babble. Then Ranboo would reword what Tubbo said, more coherently. And Tommy resisted his urge to just scream, because that was their dynamic. Of course it was! Tubbo was the controlled forest fire and Ranboo was damage control.
What Tommy did not expect was when he had pointed that out, his friends didn’t let him burn out like he thought they would. Tommy wasn’t the tree burning up, Tommy was the water that Ranboo was using to put it out.
They had hung out at Ranboo’s all weekend, after that. Sam was busy and couldn’t handle the noise, Tubbo’s dad worked nights and refused to leave the house to them alone. Ranboo’s cousin was cool about it, thank god. The guys' friends were fucking awesome, Tommy thought. The shorter American was telling him about Molotov Cocktails and one with the stupid fucking glasses tried to teach him and Tubbo some clutch in Minecraft.
Tommy wasn’t afraid to admit that he lost.
The train, as it always does, stops in front of him. Tommy didn’t hesitate this time, grabbing his seat at the back. There might have been more of a skip in steps this time, but no one he knew was there to point it out. The woman at the front promptly ignored him. He sat down, hands tucked firmly in his jacket pockets.
He did not doubt that Wilbur would show up this time. The man himself had indicated that he’d love being proven right. Tommy was willing to let him take this, to take this ego boost. Tommy knew when to admit that he was wrong— he was, okay?
“I like your pin.” Ranboo’s cousin said, passing him a coke from the fridge. “Smile. Nice.”
Tubbo looked at him, his eyes settled on Tommy’s jacket. He reached out, fabric gripping up in his hand. His thumb ran over the yellow and black pin. “Bee.” Tubbo tilted his head. “When did you get this?”
“Oh. Uh.” Tommy stuttered. “Uhm. Two weeks ago! There’s this cool shop a bit out that sells them.”
Tommy fiddled with the bee, adjusting the diagonal position it had fallen into. He didn’t tell Tubbo or Ranboo about Wilbur— he didn’t know how to explain it. How to explain him. He didn’t want to tell them what had led him to go to the train station in the middle of the night. That was a conversation that Tommy was simply not ready for, yet.
Wilbur was also eerie, and he was sure that only Tommy himself could deal with his weirdness for a whole night. He would probably psychoanalyze Tubbo and make him cry, or monologue to Ranboo and give him a breakdown. He’d keep them separated for a bit, Tommy decided.
When they pulled into their next stop, Tommy didn’t shut his eyes this time. He watched Wilbur come into view through the window. Wilbur entered swiftly, following behind a man that nabbed a seat in the front.
“Hello, fellow science experiment,” Wilbur grinned, placing himself down opposite Tommy. “I assume it went well?”
If Tommy was in a worse mood he would curse him out. “I’ll have you know, it went exceptionally well, Mr. Soot. I even walked here with a bit of pep in my step. I did that! Not you!”
“Of course you did, they were your words, I just gave you a motive.” Wilbur hummed.
Tommy scowled. There it was. “You’re a prick,”
“A correct prick.” Wilbur said. “So your friends took it well then?”
Tommy hesitated. “Well. You could say that? They’re trying, now. They’re listening. I’m not just hitting the pavement anymore. But we’re talking! And we spent the whole weekend at Ranboo’s!”
“So you are getting somewhere,” Wilbur concluded. Tommy nodded.
“It— it’s nice enjoying myself, hanging out with them. Ya know? Like it’s not a chore. It’s easy. I don’t have to zone out to be around them.”
They stopped. No one got on, the man remained at the front.
When Tommy was around them, he would have to do that. Zone out. Sometimes it wasn’t on purpose, other times he just found himself begging to just go, anywhere else, but he was too aware to go away, their voices were too loud and the air was too cold and Tommy couldn’t fucking breathe—
He didn’t feel that way all weekend.
Tommy didn’t feel trapped. He was in the present. He was in the present and he was happy. If not just for a few moments, Tommy was okay and he didn’t have to think about anything else.
“So it worked,” Tommy said. “It did! We’re working on it; this weekend was fucking great though. I know how to make a Molotov Cocktail now—“
“You what —“
“I didn’t actually make one,” Tommy emphasized. “I was just taught how! It’s quite easy actually! Ranboos' cousin, one of his friends just... it was a lot of vandalism advice.”
Wilbur groaned. “Please do not get arrested for vandalism. You need better influences.”
“You’re a bad influence,” Tommy waved him off. “don’t worry big man. Can’t come to see you if I’m arrested. Sam would also kill me. In cold blood. Dead, I would be dead as fuck, man.”
If Sam had to bail him out for something as stupid as setting something on fire, he would be so fucked. Oh, Sam was so fucking overbearing when he was paying attention, he would never hang out with Ranboo again. Or Tubbo for that matter. Sam would deadbolt his door closed. Tommy would never see the sun again. Screw prison, Sam would lock him up himself.
Tommy will not be doing that, thank you. If anyone offered to help him burn something down, he would certainly not be taking it.
They stopped. A woman got on, the clanking of her jewelry as she sat down echoing in Tommy’s ears.
“How am I a bad influence?” Wilbur enquired.
“HAH!” Tommy blurted. “Look at me! Mr. Soot! I go on trains in the middle of the night! I gamble with teenagers. I am suuuuuuch a good role model.”
“I do not gamble with teenagers!” Wilbur cried. “No money has been placed! I told you that!” Wilbur accused. “Also I am not the one telling you to blow stuff up.”
“ Memememememe — I said nothing about blowing anything up,” Tommy argued. “I was at most implying arson. I said absolutely nothing about exploding shit! That’s you!”
Wilbur slapped his hand against his forehead. “Oh, you insolent child!”
“Oh, you cryptic old man!”
Wilbur shot up. “Hey!”
“I hardly know anything about you,” Tommy retorted. “You— you could be a war criminal or something for all I know—“
“Do I look like a fucking war criminal to you?” Wilbur interrupted.
“... You could be!” Tommy exclaimed. “What’s your favorite color?”
“What is your favorite color?”
“Red. Answer the question.”
Wilbur groaned. “Blue. Used to be teal.”
“Why did it change?” Tommy pressed.
“There is not enough of it here,” Oh god, Tommy thought. Here we go. “The sky is cloudy. The water is gray. It is muted, it is drowning in black and white film instead of saturation. I wish there was more of it. Especially down here.” He longed, Tommy was exasperated.
“Wilbur, we are underground. Look at the graffiti.” Tommy deadpanned. “Or just go on Google man. Color blue— not everything needs to be a Greek tragedy.”
“That is not a natural blue,” Wilbur objected. “It is artificial! From a spray bottle, or on a screen!”
“I’ll bring you some flowers or something, okay?” Tommy snapped. “You’ll get your fucking blue.”
“I will sneeze on you.”
Tommy hit the side of the seat. “You will not!”
Wilbur made a face, rearing his head back. “A—a— ACCHOO. Like that. But you will not be expecting it.”
“Fuck you! And your blue!” Tommy exclaimed, Wilbur cackled.
“And why do you like the color red so much then?”
There was no special reason as to why Tommy enjoyed red. When teachers asked in primary school he gave it as a response, no deep or intricate thought attached to it. That was the difference between him and Wilbur. Everything Wilbur did and said seemed to have some sort of deep thought attached to it, everything he said was planned out, and said carefully.
Tommy was decidedly not that.
Tommy existed in the moment and Wilbur existed around it, quietly observing. Whispering. Taking notes.
“No reason,” Tommy shrugged. “It’s just kinda nice. Loud.”
“Like you.” Wilbur teased.
Tommy groaned, hitting the back of his head against the glass. “Stop patronizing me! I’m done doing color theory with you!”
���Oh I can do color theory—“
Tommy put his hands out, gesturing for him to stop. “No, no. Please do not. I’m begging you. I can only handle so much of your monologues.”
Wilbur scoffed. “My ‘monologues’ are fantastic, I will have you know.”
“You should write songs,” Tommy said. “You’re a right emo; you— you— you could take all that messed up shit up there,” Tommy pointed. “and make stuff. I dunno.”
“I mean I used to,” Wilbur breathed. “not anymore though.”
“Why not?” Tommy pushed.
“Have not felt like it.” He said simply. “No fun in doing it anymore. Can not even sing to anyone.”
Tommy’s brows furrowed. “That’s shit,” he grumbled.
“Poor me, having to exist being friendless!” Wilbur sighed. Tommy knew he was being dramatic, but it still made Tommy glare.
“Hey!” Tommy objected. “I’m your friend!”
“That just makes me sad,” Wilbur groaned, rubbing his face. “we are friends?”
“ Nooo,” Tommy drawled. “I only meet mere acquaintances on the tube line in the middle of the night.”
“You came back here because of our deal,” Wilbur pointed out. Tommy’s brows creased, because technically he was right. To be proven right, to be proven wrong, that’s why he kept coming here. Some sort of odd mutual trust and genuine curiosity enabled Tommy to keep coming back.
Sam might call it a lack of self-preservation.
And he wouldn’t be wrong, sneaking out in the middle of the night, to a tube station, alone, to meet a practical stranger was in every right dangerous. The first time Wilbur had stumbled into the seat across from him, Tommy couldn’t bring himself to care about that part, the danger. If Wilbur had mugged him then and there it wouldn’t have changed anything.
Once again, the thought of not seeing Wilbur again was bothering Tommy. Did Tommy want to make another deal? To continue this odd tradition? Tommy felt, alright. Kinda. He was happy. This was a good weekend. His classes yesterday were bearable, the overwhelming feeling to pull his hair out was muffled under the warmth in his chest.
Did feeling better mean he would never see Wilbur again? Surely they could keep doing this. Just a... check-up.
“You should play again,” Tommy suggested. “if not for anyone else, then just for yourself ya know?”
“Do you play anything?” Wilbur asked.
“I know piano,” Tommy thought. He hadn’t played said instrument in a bit. He had a keyboard that sat in his closet collecting dust. He hadn’t taken it out since he moved into the flat with Sam. “I haven’t played it in a while. Too much noise.”
Their stop was coming, Tommy realized. Tommy hit his leg awake, standing up. “Guess we will dive into that later,” Wilbur said. Tommy shook his head.
“No, no,” Tommy was going to put a stop to that right now. “I’m not you. There’s no deep, depressing reason. I just don’t play anymore. Stop psyche evaluating me, or whatever the fuck you people call it.”
“Alright, alright.” Wilbur said lightly. Taking the lead as Tommy followed him out. “Are you still going to get pins?” Tommy hummed an ‘mm-hmm’ in response.
“I like the pins,” Tommy confirmed. “Do you want anything?”
Wilbur shrugged him off. “Nah,” He waved. “Knick knacks, I would have no use for that. Nowhere to put them.”
“Are you homeless?” Okay, that was a bit rude, Tommy would admit. But that slipped, alright? “Because that would explain a lot actually.”
“ No,” Wilbur said immediately. “I have a house, Tommy.” He groaned in exasperation. “Believe it or not, I can exist in different places other than a tube station. ”
“No, but it makes sense! Every time I see you you’re wearing the same shit!”
“It is my Tuesday jumper,” Wilbur defended. “I already told you that.”
“ It is my Tuesday jumper .” Tommy mocked. “Fuck you. You don’t have a house.”
They stopped outside the glowing Jack Of All Trades sign.
“Get something cool this time. Like an orca.” Wilbur suggested as Tommy pushed open the glass door, Tommy mumbling a ‘will do’.
Jack leaned over the counting, scrolling through his phone. His eyes met Tommy as he strolled further into the shop. “Hello again!” He put his phone down on the counter. “I was wonderin’ if you were gonna show up.”
“It’s become a habit,” Tommy said, reaching into the bowl.
“What’s ya name again?” Jack enquired.
Oh, Tommy realized. “Tommy,” He answered. He took the blood-orange-flame-shaped pin in his hand, placing it on the glass counter.
“You’re gonna run me out of pins,” Jack joked, sliding the pounds over to the register.
“You’re gonna run me broke,” Tommy joked back. He clipped the pin in, securing it. “Bye Jack!”
Jack waved as Tommy pushed out the door. Wilbur stood waiting for him, raising his eyebrow as Tommy showed him the new pin. “You did not get an orca,” Wilbur pointed, disappointed.
“He didn’t have any orcas, big dubs. Is that why you got banned?” Tommy asked, turning backward as he walked in front of Wilbur. “He didn’t have any orca merch? Is that it, Wilbur? Have I cracked the mystery yet?”
“Nope!” Tommy’s excitement visibly dropped. “Good guess! Still wrong.”
“ Ughhhh, ” Tommy groaned, kicking a stone. “Fuck you, man. Just tell meee,” Tommy begged.
“No,”
“Please.”
“Still no.”
“Did you steal something?”
“No.”
“Did you kill his mother?”
“ What ?!— Tommy, no!”
“Are you a felon, Wilbur?”
“Let me stop you while you are ahead,” Wilbur said. “The answer is no, no, and no. To everything.”
Fuck you, Tommy thought. He didn’t like not knowing things. He’d figure it out. He would drop it for now, because this clearly wasn’t getting anywhere, but he’ll make Wilbur slip. He will! He just needs to catch him off guard. He could do that! Outsmarting Wilbur would be a feat, an accomplishment.
“I’ll figure it out, you watch,” Tommy grumbled.
“Good luck with that Toms,” Wilbur hummed.
“I don’t need luck,” Tommy stated. “Just my big brain.”
“You do have a big head,” Okay, that was mean, Tommy thought.
“That was unnecessarily rude,” Tommy stated. “I can’t believe you’ve done this to me, Wilbur. My self-esteem. It’s ruined.”
“Oh come on,” Wilbur retorted. “I have a big forehead. Look.” Wilbur lifted the curly bangs that framed the front of his face.
“Oh no,” Tommy cried. “Don’t do that, please. My eyes! I can’t stare directly at it!”
Wilbur fixed his hair, chuckling. “My jumper buddy used to call me Forehead-Bur.”
Tommy snickered. “Jumper buddy sounds cool.”
“He really is not. He is a real loser.”
“Like you?” Tommy chortled.
Wilbur scoffed. “Shut it!”
When they got to the station, two women were standing together on the platform. Tommy nodded politely while Wilbur simply ignored them. When it had pulled in, Tommy trailed Wilbur to the back. The two women had sat down at the front.
“Got any plans for this week?” Wilbur asked, Tommy shrugged.
“Got a test Thursday. That’s about it.” Tommy thought. “I think Tubbo wanted to go to the mall Friday, dunno. I’ll have to text him.”
It would be the next time that Tommy would see him; his, Ranboo’s and Tubbo’s schedules made it difficult to see each other during the week. Tommy was no longer actively avoiding them now, though. Maybe Tommy could set up a game of Pub G, or CSGO.
He was starting to feel guilty for blowing them off, actually. Tommy would have to make up for that. He didn’t really regret coming to see Wilbur, he couldn’t. If Tommy was given the choice between playing a first-person shooter game on a Tuesday night with them versus… this…
Tommy knew what he would choose.
They stopped. No one on or off.
“You have anything planned?” Tommy asked.
Wilbur did not look like he was expecting to be asked. “Hmm,” He wondered. “Might go see my dad. Been a bit.”
Tommy did not know why that had shocked him so much. A father! Everyone had a father, Tommy knew that alright? That was completely logical.
Wilbur had just, given off the feeling of someone who didn’t have anyone. Wilbur was a feather floating in the wind. Tommy supposed that feather had to come from a bird then, perhaps it was missing it.
“You should bring your dad something,” Tommy said, shaking off the frown.
“Like what?”
“Like— like a snowglobe or something man, I don’t fucking know. Flowers!”
“He likes birds,” Wilbur thought aloud.
“Chicken,” Tommy decided.
“ No,”
“Chicken,” Tommy repeated. “You gotta let me know how that goes next time.”
“Next time?”
Oh.
They stopped. The two women left, the brunette left quickly while the blonde frowned at him.
Tommy forgot that they hadn’t even thought of another deal yet. Did they need that at this point? Couldn’t Tommy just show up and trust that Wilbur would be there, deal in the air or not?
“I... I—I think I want to keep doing this?” Tommy admitted, pulling at his hair. “Showing up. And talking, to you, ya know? I enjoy it. I keep thinking like, what deal, what bet this time we could make again. And nothing comes up.”
“You want another deal?
“Do you?” Tommy asked, genuinely. “I don’t… I don’t want to make you feel like you have to come back here.”
They stopped. A small group got on, this time kids around Tommy’s age holding bottles wrapped in brown bags.
Wilbur thought for a moment, like he was mewling over his next words carefully. “As long as you need me, we can keep doing this,” Wilbur said softly.
Catharsis, there it was. Tommy swallowed. “Okay. We can do that.” It was another deal, in all technicality. An extended one at that. Conditional.
But Tommy was relieved from that pressure of not knowing if there will be a next time. Because now he knows for sure there will be! And another after that!
Wilbur might have started as a buffer to what Tommy considered the inevitable, a simple delay. Despite the serotonin high that he had for the past few days, Tommy hadn’t forgotten about Wilbur. He hadn’t forgotten about why he met him in the first place.
Did he want to anymore?
Tommy didn’t have an answer, apparently.
That’s why he needed these meetings with Wilbur to continue, they got him to the end of the week, they got him through his current problems. He helped him fix his relationship with Tubbo and Ranboo. Maybe Tommy wanted to figure out what he could solve before he left. What he fixes— then he’ll decide.
He’d make up his mind then.
Because was Tommy’s decision to make, not Wilbur’s. Not Sam’s, not Tubbo’s, not Ranboo’s. His. He knew that. Alright! Tommy knew that.
They stopped. The loud group got off.
Tommy eyed them as they left. “It looks like you asked the wrong teenager for booze,”
Wilbur cackled, his boisterous laugh filling the now mostly empty train car. “I had forgotten I did that,” He giggled, wiping away at his eye.
“I didn’t!” Tommy pointed. “Man, I thought you were going to stab me. Or demand for my wallet. Or both.”
“You thought I was going to mug you?”
“You asked me for booze!”
“I was breaking the ice!”
“You break the ice by asking for alcohol ?”
“Yeah! You looked miserable. I thought you could use a good laugh.”
“I didn’t,” Tommy said. “I clicked a pen at you. I was prepared to stab you with that in case you were a wrongun.”
“Oh no, ink poisoning,” Wilbur dismayed. “What will I do?”
“Go to the ER,” Tommy replied. “But you’re probably banned from that too.” Wilbur was silent. Tommy had meant that as a joke. “Wilbur…”
“It is a long story,”
“Oh my god.”
“It is!”
“Geez man,” Tommy rubbed his temple. “And you scold me for making jokes about Molotov Cocktails!”
“They are mini bombs.”
“And you’re not allowed in places in half of England!”
“I did not set anything ablaze, Tommy,” Wilbur said, rising. His stop was next. The night was coming to an end. “Try not to get arrested between now and next week.”
There it was, his confirmation. “No promises big man!” The train was stopping. “Try to stop pissing people off!”
“See you, Tommy!” Wilbur stepped out, not looking back at Tommy.
When they moved again, Tommy startlingly realized that he was alone. Just him. Two weeks ago, Tommy would’ve killed for this. He would’ve died for this.
Tommy sat alone, and the flashing markers of the tunnel were too bright and the rumbling, vibrating feeling of the tube going at its ungodly speed was nauseating because Tommy should’ve been—
He could’ve been—
Tommy shook his head. Squeezing his eyes shut. He could drown out the lights. He was okay. He was alone, and that was okay. It didn’t matter. Being alone didn’t make a difference. Nothing changed. The time of the night was really starting to become very prominent to Tommy. He wanted to go home and just sleep. Tommy checked his phone, no new messages other than some old Instagram notifications.
When his stop came up, he practically bounced up and sprinted off of the train, pushing past a concerned-looking ginger woman. He was up the steps before the train could even pull out.
Tommy was alive for right now, and he was okay with that.
#wilbur#wilbur soot#tommyinnit#tommy#crimeboys#crimebois#sbi#sleepy boys inc#crime bois#crime boys#dream#dream smp#sleepy bois inc#wyt shutupanakin#shutupanakin posts
23 notes
·
View notes
Text
FOOD THAT BOOST’S IMMUNE SYSTEM IN ADULTS
In a post COVID ravaged world, everyone has just one question on their minds, “How can I strengthen my immunity from the inside?” Overall, your immune system performs an excellent job of protecting you from disease-causing germs most of the time.
But occasionally it fails: when a pathogen infiltrates your body and makes you ill. Is it feasible to intervene and strengthen your immune system throughout this process? What if you changed your diet? Should you take vitamins or other supplements? Make any additional lifestyle adjustments in the hopes of eliciting a near-perfect immunological response?
You can find your answers to all these questions and more throughout the course of this article.
How to boost immune system naturally?
The prospect of increasing your immunity quickly is appealing, but the capacity to do so has proven to be challenging for a variety of reasons. The immune system is, in fact, a complex system, and not a single organ. It requires balance and harmony to work properly.
There are still a lot of experts who despite spending years of their career studying the immune system, don't understand about the complexities and interconnectivity of different immune responses. As of now, the influence of lifestyle on the development of natural immunity is not comprehensively understood.
But it doesn't imply that the impacts of lifestyle on the immune system aren't significant and should not be researched any further. In both animals as well as people, researchers are investigating the impact of nutrition, age, exercise, psychological stress, and other variables on immune response. Meanwhile, general healthy-living techniques make sense since they are expected to improve immune function over time, as they display some other documented health advantages.
Healthy ways to strengthen your immune system
Your first line of protection for bolstering your immune system should be to live and maintain a healthy lifestyle. Following basic good-health principles is the single most important action you can take to proactively keep your immune system in excellent functioning order. When you shield your body from environmental intrusions and supplement it with healthy-living tactics like the ones listed below, all aspects of your body, especially your immune system, perform better.
Quit smoking
Consume a diet rich in fruits and vegetables
Engage in regular physical activity
Keep a healthy weight
If you consume alcohol daily, do so in moderation
Get enough sleep
Take precautions to avoid infection, like washing your hands often and properly cooking meats
Make an effort to reduce stress
Be up-to-date on all prescribed immunizations. Vaccines prepare your immune system to combat illnesses before they enter your body.
Why is eating healthy important?
The in-built battalion of your immune system starts its march within your stomach, just like any other battle force. Immune system soldiers in good health require consistent nutrition. Scientists have long observed that poor and malnourished individuals are more prone to getting bedridden with infectious illnesses. For instance, experts are of the opinion that some dietary components, such as a high simple sugar intake or processed foods, would have a negative impact on immune function. These opinions were formulated by research conducted on the impact of diet on the human immunological system.
There is some indication that different deficiencies in the body's micronutrient levels, such as selenium, zinc, iron, folic acid, copper, and vitamins A, C, B6, and E, influence immunological responses in animals, as evaluated via their test tube body fluid samples. However, the significance of these immune system abnormalities on animal health is less evident, and the effect of comparable abnormalities on human immunological response is yet to be determined.
So, what are your options? If you feel that your diet isn't meeting all of your micronutrient demands — perhaps because you don't enjoy veggies or that certain foods are unavailable where you live— taking a daily mineral and multivitamin supplement may provide additional health advantages in addition to any immune-boosting effects. Taking massive amounts of a single vitamin does not work. More isn't always better. Ensure that your supplementary vitamin dosage is regulated as per your health advisor's directions.
Immunity boosting foods for COVID
The food you consume registers significant impact on your overall health and immunity. Consume meals low on carbs to help reduce high blood pressure and blood sugar. A low carb diet can help reduce the progression of diabetes, while a protein-rich diet will keep you be in shape.
In addition, eat vegetables and fruits high in ascorbic acid, beta carotene, and other necessary vitamins on a daily basis. Certain foods, such as mushrooms, bell peppers, tomatoes, and green vegetables like spinach and broccoli, are also effective candidates for enhancing the body's resistance to infections.
If going out to buy foods isn't an option due to local lockdown in your area, you can take omega 3 fatty acid capsules to boost up your daily nutrition intake.
Ginger, gooseberries (amla), and turmeric are examples of natural immune boosters. Some of these superfoods are regular components in Indian cuisines and snacks. Garlic, Basel leaves, and black cumin are among herbs that might help increase immunity. Sunflower seeds, flax seeds, pumpkin seeds, and melon seeds are high in protein and vitamin E.
Natural probiotics such as yoghurt, and fermented foods are also good sources of rejuvenating the balance of gut bacteria, which is essential for nutrition absorption by your digestive system. These are also fantastic solutions for the elderly.
Foods that weaken immune system
The immune system protects the body from communicable diseases such as the common cold, flu, cholera, typhoid etc. Nutrition is a crucial aspect in maintaining a healthy immune system.
High blood sugar levels have been linked to a weakened immunological response in studies. Restricting your intake of beverages and sugary foods can help you regulate your blood sugar and boost your immune system.
1. Processed foods
Many processed foods are high in bad fats, carbohydrates, and chemicals. These are used to improve the texture, taste, and shelf life of a food, but several research studies demonstrate that they may impair the immune system.
Some processed meals containing a lot of ingredients are:
microwaveable meals
canned foods
chips
cakes and cookies
According to one 2017 research, consuming foods containing chemicals may raise the risk of a number of chronic metabolic or inflammatory diseases. Sucralose, carboxymethylcellulose, aspartame, sodium, polysorbate-80, and carrageenan were among the additives investigated in the study.
The researchers also discovered that persons who consume a lot of additives are more likely to be obese, have insulin resistance, and immune-related inflammation.
Meanwhile, according to a 2014 review, a high consumption of salt, refined sugar, and saturated fatty acids, along with a lack of omega-3 fatty acids, can all contribute to damage the immune system.
2. Foods that are high in sugar
People who consume a lot of sugar have a higher chance of developing various chronic diseases, including type 2 diabetes and coronary heart disease.
Common sugary foods include the following:
marmalades, preserves, and sweets
flavored milk and sweetened dairy products
cakes and cookies
sugary breakfast cereals
sugary drinks, like soda and soft drinks
A high-sugar diet may also impair the immune system's ability to fight illnesses. This might happen by a decrease in the efficiency of white blood cells that helps in boosting inflammation.
3. Foods that are high in refined carbohydrates
Processed and high-refined-carbohydrate foods, such as refined sugar and white flour, have been linked to increased oxidative stress and inflammation, both of which can impair the immune system.
Refined carbohydrates can be found in the following foods:
white rice
sweets, cakes and cookies, made with white flour
white bread
The Final Takeaway
Anyone wishing to boost their immune system should avoid diets heavy in processed carbs, additives and sugar. These foods may have an anti-immune effect.
On the other hand, a diversified, nutrient-dense diet, may help enhance your immune system and minimize inflammation.
3 notes
·
View notes
Note
hi, just wanted to say that i love your tutorials! you have helped me improve so much in photoshop, i cant thank you enough. I was wondering if you know how to archive this edit? (riddlemarvolo(.)tumblr(.)com/post/189886322626/after-all-this-time-always) do you think you can make a coloring tutorial about it? i've tried myself to do it but i don't know how, it never looks like that.
Yes I can! Tutorial on how to get these gifs below:

There are a few ways to get these kind of gifs, I will show a few different ways. My main tip to achieve these gifs is to choose scenes that can easily be manipulated. Don’t try to make a bright yellow gif out of a dark scene. It may be frustrating if you have specific scene, but it will pay off in the end.
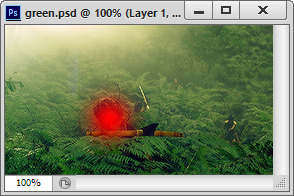
On to the first way to get this look and also the easiest, and that’s to focus on the color that’s already predominantly in the scene (like grass is green, fire is red, oceans are blue, etc).
This is my first gif, with sharpening only:
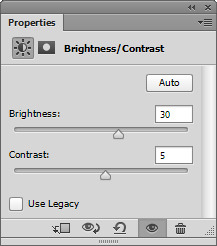
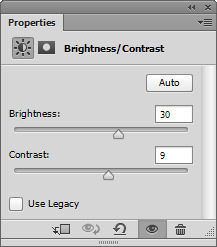
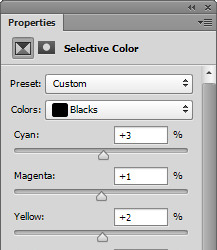
As you can see that main color is green, so instead of changing that to blue, I want to enhance the color. To start I’ll just a few brightening layers. A “Brightness/Contrast”, a “Levels” and an “Exposure”. It doesn’t really matter what settings you use as long as you gradually brighten up your gif. I also want to edit the blacks and whites with a “Selective Color” layer. I won’t show these settings, but I have tutorials on literally everything here.
So here’s my edited gif:

I didn’t add to the colors, saturation or vibrance, but to achieve really solid colors, I want to start with a “Selective Color” layer. I will edit all the colors a little bit, but I want to focus on my main color, green. Here are my settings for the yellow and the green:
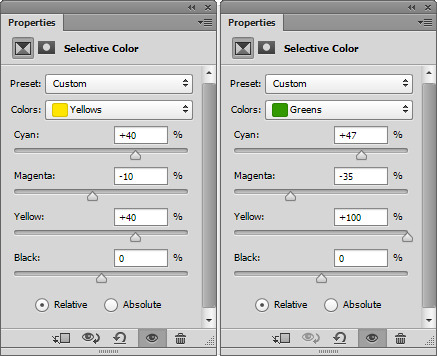
A tip for green is to add to both the “Cyan” and the “Yellow”, that way it’s more green then orange-ish. I also edited the yellow since yellow and green colors tend to blend together.
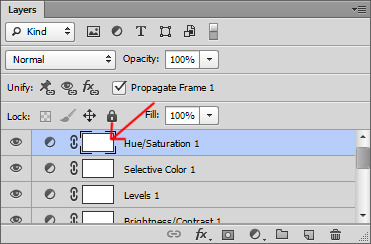
I also want to add a “Hue/Saturation” layer and on the main slider, slide it just a bit to make the overall color green (or whatever your main color is), here’s my setting:
And my gif now:
Since this changed the skin color as well, I want to use a soft, round eraser brush and on the layers, click on the alpha layer of the “Hue/Saturation” layer, this will allow you to edit where the adjustment layer shows on the gif.
For tutorial purposes, I’ll show you with a color layer where I used the eraser:
And the layer now:
Now my gif:
You can also edit the skin tones (and other non-main colored areas) and use the alpha layer to erase everything but the skin.
Now to make the color pop, add a “Selective Color” layer editing your main color, mine being green. Then duplicate this layer a few times for an intense look. You can do this for any color, edit the “Red” for reds “Blues” for blues and so on, then just duplicate the layer.
Now to really make the colors pop, I want to add another “Brightness/Contrast” layer and really brighten the gif. Here’s my settings:
Here’s my before gif:
And after:
Here’s another gif I did, this time instead of focusing on green, cyan and blue was my focus:

The second way is to change the color that’s already predominantly on the gif (like changing a blue sky to pink, or a light blue snowy scene to dark blue).
This is pretty easy after the first tutorial. Once you have your gif ready and up to the “After” step above, you can use a “Selective Color” layer and a “Hue/Saturation” layer to alter the color of the gif. It can be something simple like green to yellow or more advanced like green to red. In either case, make sure to gradually change the color, rather than one big jump.
Here’s my gif:
And here’s my gif now using the steps above to bring out the yellow:

Now, I want to change the yellow to something more appealing (lol), so I want to go to red. First, I want to add a “Hue/Saturation” layer, only edit the channel of the color you’re editing, so for me, I’m only working on the “Yellow” channel. Here are my settings:

And my gif:

So if you make a drastic change, the skin might need help, but just do the same thing as above where you click on the alpha layer of your “Hue/Saturation” layer and then erase the part over the skin if needed. My gif now:

Se how the whites look pink-ish and the blacks look dull? To make the gif look “less edited” you might want to touch up the blacks and whites of the gif using a “Selective Color” layer. Basically if the whites or blacks are too toned to a color and it’s obvious then edit the whites and blacks. Here are my settings for both:
and my gif now:

Now just finish off with another “Selective Color” layer and duplicate it a few times like above and your done! Here’s my before:
And after:

And another gif where I changed the red to green. Here’s the before:

and after:
The last way is to completely change a color to match your color scheme (like a green forest to blue or a beige paper to purple), but there’s two ways to do this. Either your scene is already extremely tinted to one color (like a neon pink lighting, or a blue underwater scene) or to use editing to change the color using color layers and adjustments.
The first is an overly saturated, one or two tone gif like this:

For that, all you need to do is use the first part of the tutorial to make the main color pop. Here’s my gif after that:
Now, add a “Hue/Saturation” layer and edit only the channel needed, mine being red. Here’s my settings to turn the red to purple:
And my gif now:

If like my gif, your color got too wild, just turn the opacity down to your “Hue/Saturation” layer and use a “Selective Color” layer to finish the job. Here’s my settings:
And my before:
And after:
To use color and adjustment layers to change the color of you gif, use the first tutorial to generally brighten the colors of your gif. Here’s mine without singling out specific color:

Now you want to decide what color you want to do. I’ll do green since it’s an easier match. So start to add a “Selective Color” layer to boost your selected color. You may also need to add a “Hue/Saturation” layer like the second tutorial. Here’s my gif:

Now to really get the color you want, add a new layer and using a soft, round brush, color over your gif where you want to change the color like this:
Then you can either set that to “Softlight”, “Hardlight”, “Color” or “Hue”. Here’s mine set to “Softlight”:

Once you get a color you’re happy with, you can use a “Selective Color” layer to make the color pop. Here’s my settings:
I also added a “Brightness/Contrast” layer to brighten the scene up, here’s my gif:
Now just finish off with a final “Selective Color” layer, editing all the colors. Here’s my before:
And after:

Here’s another gif that has a more drastic change. The before:
After:

And to get the white and black gifs (and the gray in between). All you need to do is find a neutral colored scene. Here’s my two gifs, the top being my white and the second my black:

For both of these, you want to start the first tutorial up until the color selecting. Here are my edited gifs:

Now for the white gif, you want to add a “Hue/Saturation” layer and set the saturation for most of the colors to -100. Don’t do this on the red, maybe the yellow channel because you don’t want to ruin skin tones. Here’s my settings:
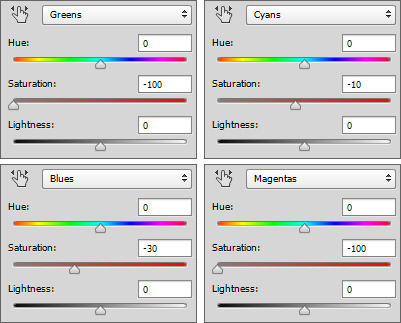
and my gif now:
I also want to add a “Selective Color” layer and darken the blacks and brighten the whites by adding to the whites. Here’s my settings:
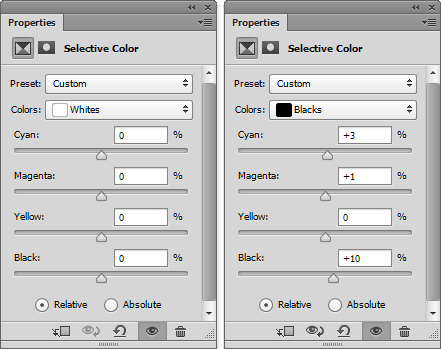
and my gif now:

Now for a final “Brightness/Contrast” layer:
And my before gif:
And after:
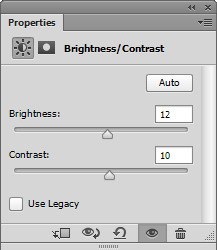
And for the “Black”, you want to really brighten and add some contrast. Here’s my setting for a “Brightness/Contrast” layer:
and my gif:

You may need to add a “Hue/Saturation” layer to remove any unnecessary colors like we did for the white gif above.
The final layer for this is a “Selective Color” layer. You really want to darken the blacks, here’s my settings:
And the before:
And after:
I hope this tutorial helps! I don’t make these kind of gifs, but if any of you need help, feel free to message me!
#gif tutorials#gif tutorial#coloring tutorial#completeresources#itsphotoshop#my resources#anon#answered
392 notes
·
View notes
Text
2 Things You Need To Consume Properly In Order To Achieve Your Fitness Goals
1.The proper foods:
Working out would be pointless without the proper fuel.
In fact, not only are there appropriate foods to maintain good health and fitness, but there’s also appropriate amounts to consider, as well as when to consume them.
For example if you’re trying to gain muscle mass, of course, foods rich in protein such as eggs and salmon would be a healthy choice.
If you’re trying to lose weight, you might want to avoid foods such as chips and fries, baked desserts, candy bars, sugary drinks, basically processed foods saturated in sugar, calories and fats.
I know, this may sound a lot easier said than done but that’s where self discipline comes in.
However, I do know a way you can lose weight and be healthy without giving up your favorite foods.
Overall, you also need to adjust your calorie intake according to your bulking phase, cutting phase or weight-loss journey.
On average, men should consume about 2,000 to 3,000 calories per day, while women should consume about 1,600 to 2,400 calories per day.
The good news is that the more active you are, the more calories you can consume.
2.The proper supplements:
As far as supplements go, it’s always good to do some research or look up what’s currently working well.
Yet to save you some time, here’s a list of the top supplements recommended to be taken regularly to maintain or improve your health and fitness.
Always make sure to consult with a doctor though, before taking any new supplements.
OK, here they are…
Multivitamins: Help you fill in the nutrient insufficiencies you may have, and boosts your health significantly. They also help you in areas like your energy, mood, memory, muscles, stress and anxiety.
We can include Vitamin D here, which helps you regulate phosphate and calcium in your body. These are needed to keep your teeth, bones and muscles healthy.
Fish Oil Omega-3: Helps you fight inflammation, sharpens your brain, supports heart health, supports eye health and boost bone density.
Calcium: Helps you build and maintain your teeth and bones, and also supports your heart and muscle function.
Magnesium: Helps you support your heart health, blood pressure, digestion, muscles and also helps you manage your stress.
Folic Acid: Helps you improve your heart health and reduces your risk of heart disease.
Zinc: Helps you prevent and recover from infectious diseases, and also needed for your immune function maintenance and growth.
Iron: Helps you maintain your physical capacity, your energy, immune system, body temperature, and also helps you resist infections.
Now, as far as the top supplements to help you lose weight or gain muscle, check out these 5 Tips To Get You In Great Shape.
The only thing I ask is that you share this with others to help them too.
Enjoy!
5 notes
·
View notes
Text
Free Vst Effect Pack

Disclosure: When you buy through our links, we may get a commission at zero cost to you.
Free Vst Effect Packs
Vst Effects Free Download
Free Sound Effects Vst
Vst Effect Plugins
Best Free Vst Plugins
Free Vst Instrument Pack
Free Vst Effects Pack
I guess you would have to agree with me that the best way to polish your vocal recording or a vocal sample is to sprinkle some effects, just like the way you would sprinkle a reasonable amount of ingredients on your food. If done right, it sounds delicious right, yum yum 😉
Improve your projects with quality free vst instruments & effects for download. Vst presets / patches and free synth vst plugins available for download. Vst4you: Big Source Of Free Vst's Loops And More Good Stuff To Start Create Music. 2Packs From last 2 successful fx alien loops releases, we are giving youopportunity to buy 2 packs.
Our list of the 55 best free VST plugins encompasses tons of categories, namely: best Guitar VSTs, best Synth VSTs, best VST plugins for vocals, bass VSTs best drum VSTs and a horde of slick effects – that one can download for FREE!
IZotope Ozone Imager. The Ozone Imager is an essential free VST plugin for trap beats. As the name suggests, this is an imaging tool you use to control your track's stereo width. To make a professional sounding track, you must control your stereo width. Commonly, your low frequencies are narrow, in mono, while you typically place your higher frequencies wide.
Vocal effects are no exception to the ingredient perspective, you need to add a reasonable amount of effects to make them sound lively, and enjoyable to the listeners.
Best Free Drum VST My mother always told me “march to the beat of your own drum”, but I guess she was wrong, because I found a bunch of really good free drum vsts. Amongst them, is the T.REX 606, a classic sound that could have easily cost hundreds of dollars, but for some reason is free. Best Free Synth VST Plugins Dexed by Digital Sub Urban Dexed is a Free multi platform and multi format frequency modulation Synth which is based on, or closely modeled to, the Yamaha DX7. You can download it here.
Don’t get me wrong, I ain’t saying you should stack effects upon effects on your vocal samples, too much of everything is bad. That said, let us look at the best free awesome VST effects plugin in the music production scene.
Let’s ride on…
Page Contents
5.) g200kg – KeroVee
10.) MGF – TimeWarp
1.) AegeanMusic – PitchProof
If you haven’t heard of PitchProof, then, you are definitely missing out, this is like the secret tool I use on Vocals but it wasn’t even developed for Vocal, it was actually designed to work on monophonic signals such as guitar solos, but I’ll give you a tip on how I have been using it:
You don’t want to apply it in realtime, what you should do instead is to first select the key of the harmony, then you turn the Blend knob all the way to the right; wet e.g:
Export the vocal result, add whatever effects plugins you gat on your toolbox (vocal, flangers, etc) to spice up the pitched vocal, and then stack it on top of the original vocal. Boom, you have something unique!
Note: You don’t have to always push it all through the wet side as this might cause artifacts, just experiment and stick with what works for you.
You can even export more vocal, and maybe this time, you can try by reducing the detune knob, anyways, experiment until you get your preferred test.
That said, let’s look at some of the features of PitchProof:
The Blend control knob would let you adjust the level of pitch shift, while the Pitch drop-down menu lets you select pitches like +7 or -7, or harmonies which are intelligent pitch-shift effects.
Moreover, there are also some options at the bottom of the PitchProof plugin which give you the option to switch between stereo and mono; mono could save your CPU, while the stereo option could cause a resource hog if used on multiple inserts.
Transient Fix can be switch on or off to spice things up a little!
Possible Harmony Options:HarmonyInfo2ndDissonant harmonies3rdThe Typical Major/minor Chord Harmony4thThe same as the +5 semitones setting except a few notes are flat.5thThe Same as The +7 Semitones Setting Except the Last Note of The Major Scale Is Flat Making It “diminished”.6thA nice-sounding alternative to typical harmony intervals.7thDissonant 7th Chord Sounds.
2.) Auburn Sounds – Graillon
This is an autotune VST plugins designed and developed by Auburnsounds. This plugin is superb in the way it handles pitch correction.
It not only supports pitch correction but supports the generation of throat sounds, making octave sounds, enriching, and enhancing vocal expressiveness.
Also, there is a pitch shift parameter that transposes vocals up and down in octaves and semitones.
Features:
Free Vst Effect Packs
Pitch Shifter cleanly transposes a voice up and down and has been optimized for voice.
Pitch Correction module brings an immediate robotic sound, while the Bitcrusher addition softly adds sparkles to the mix.
Freemium
System Requirements
Available as VST, VST2, AAX, and Audio Unit plugin for macOS and Windows platform.
Download Graillion Auto-Tune Plugin
3.) JHudStudio – Vocal King
Vocal King helps glue the vocal in a mix, and it comes preloaded cool parameters, that could help in customizing the audio signal of a vocal track.
The Pres Compressor knob helps in bringing out the clarity of a vocal, so, by turning up the gain of the Pres Comp brings out the presence in the vocal along with giving it a smooth compression. On the other hand, the Low cut, Tighten, and the Bass knob compliment the Pres Comp in taking out muddy frequencies without the vocal sounding too thin.
I also love playing with the Crispy knob as it sprinkles some sparkles to the audio signal.
Features:
Help vocals to stand out in a mix by giving them amazing presence, clarity, and compression. Can easily work on any other content.
Acts like are preamp giving the signal a strong boost.
Easy to use interface for fast results.
Easy to read meters
Very CPU efficient compared to other types of plugins.
It can be used on many other audio sources as well.
System Requirements
Vocal King supports MAC/Windows/32bit/64bit/VST2/VST3/AU. Supports MAC OS X 10.7 / Windows 7 and higher. Older systems may not work.
4.) Sonic Anomaly – Vola
Vst Effects Free Download
Vola is a Voice Optimized Leveling Amplifier made for broadcast voice dynamics processing, it also works with different kinds of audio material, like drums, percussive instrument, and synth pads.
Free Sound Effects Vst

This fantastic tool is solely for cleaning up sound files but can be used for extreme compression effects as well.
Features
Real-time Visual Metering for changes in dynamics
Upwards & downwards compression, each separately adjustable.
Stats Display and more compression settings
Download Vola Vst (Windows)
Download Vola Jsfx (Windows and Mac)
5.) g200kg – KeroVee
This is a pitch correction VST plugin tool and has strengthened to support natural pitch correction.
This tool is handy and can perform different and various types of voice effects, for example, a conversion of the male voice to a female voice and vice versa.
KeroVee comes bundled with useful parameters for the effectiveness of the auto-tuning process, Parameter includes:
Scale Button: This is for specifying the scale you want to tune. Setting a wrong scale would result in an awful result, in a simple sentence, Know your scale before you go into this one
TuneSpeed: This will allow you to set the speed of correcting the pitch.
Nuance: This is one of the best and lovely parameters, you can use this to set a fine vibrato of the original sound, use this to create all sorts of weird effects.
Amount: Set to zero (0) if you want no correction, setting to 100 will result in full correction of the pitch
and many more parameters like Transpose option, master volume, etc.
System Requirements
A compatible host program that supports the VST formats
6.) Martin Eastwood – Duet
Have you heard those natural double effects in some tracks! Do you wonder how those are created? I guess yes 😉
Let me introduce to you – Duet, a double-tracking effect designed to enhance your audio sample be it vocal or even instruments, Duet is well capable of sparkling them up. The way Duet work is by pitch-shifting both the left and right inputs individually using a novel synchronous overlap and add technique, allowing pitch to be manipulated in real-time while still maintaining the time duration of the audio.
One thing I love about Duet is the way it can accurately create the illusion of multi-voices and adds varied texture to the mix. Experiment with Duet to see how it works.
Note: This is only available for Window
7.) MaxSynths – DSP-2
DSP-2 is designed with an intelligent Dynamic Processor, a 4-band equalizer fixed on vocal key frequencies, a saturator, and a room emulator based on the Schroeder reverberator. DSP is super simple to use and can serve basically all your vocal processing needs, again, experiment and keep experimenting to get the best settings that would soothe your need.
Features:
Intelligent Dynamic Processor (IDP).
4 different automatic operative modes.
Selectable compression ratio.
Saturator with three different operation modes.
EQ fixed on vocal key frequencies.
Room emulator based on the Schroeder reverb model.
Transparent increment of the perceived volume level.
High precision input/output VU-meter.
Low CPU usage.
8.) Distorque – Azurite
Azurite is a vocal effect by Distorque which is built for multi-voice chorus with a focus on rich sounds and versatile controls.
According To Distorque:
My goal in designing it was to make as flexible a chorus as possible without losing great tones and ease of use. The result is an effect that will be handy for producers, guitarists, and glitch lovers alike.
One of the great features of this plugin is the way you can create multiple simultaneous voices. Each of these voices can be further customized with their own delay line that is modulated by a separate LFO. Adding multiple voices leads to a thicker, smoother, and less wobbly tone. It also makes vivid stereo spreading possible with a mono signal.
The voice control helps you to choose how many voices you want for the chorus, e.g one, two, four, or eight.
Features:
Stereo or mono operation.
Colour control emulates vintage analog choruses.
2 band EQ.
LFO tempo sync.
Feedback control allows for flanger sounds.
27 built-in presets.
Delay time from 0.2ms to 200ms.
7 LFO shapes: Sine, Triangle, Sawtooth, Ramp, Exponential, Inverse Exponential, and Random.
Spread control for a stereo widening of a mono signal.
Control randomizer.
Other controls: Depth, Speed, Wet Mix, Output, Separation, Dry Delay.
Note: This is only available for Window
Download Azurite Win 32 VST / Win 64 VST
9.) TerryWest – EasyVox
EasyVox contains a bunch of tool for vocal processing, such as:
Dynamic mono vocal compressor/limiter/enhancer
Three bands equalizer
Autogain and Pre-Limiter
Auto Noisegate
Auto Band-off
Three EQ models
Fine EQ option
EQ activity/bypass LEDs
Low-Mid-Hicut
Vocal Doubler effect
Pre in/Post out gain
In/out/reduction meters
Donate To The Developer, It helps him to build more exciting plugins
Note: This is only available for Window
10.) MGF – TimeWarp
Last on our list is Timewarp by MGF, which is a vibrato effect with 2 LFOs which can pan the pitch modulation amount for a stereo effect.
Features:
Vst Effect Plugins
Sine, Triangle, Saw and random waves with control over the shape and smoothing.
Optional 4x upsampling and a smooth modulation algorithm ensure clean sound with minimal aliasing. Normal quality
saves CPU and sounds brighter but less silky.
2 different interpolation algorithms are available (ALG).
Fast modulation settings possible and encouraged
That is it, Good luck and have fun with music!
Useful Related posts:
Native Instruments MOD PACK takes three classic modulation effects – chorus, flanger and phaser – and adds features never seen before. Each offers exciting new creative possibilities as well as stunningly convincing vintage-style results, making MOD PACK a must-have upgrade from the rest of modulation effects.
Best Free Vst Plugins
Native Instruments Choral: Drawing sonic inspiration from some of the most iconic chorus effects from the past 40 years – including iconic stands and unison synth effects. Add width, movement, sparkle and shimmer to any signal, or take advantage of the new Scatter feedback mode. This avoids unpleasant metallic sounds. Instead, a completely new effect similar to reverb is created. The classic effects contained a small number of settings – On, Off and Type are usually the only controls. Our plugin offers many customizable options. The number of voices can be set gradually from one to three, the sync speed can be manually changed, as well as the modulation speed, volume, mix, delay time, stereo width and feedback.
Free Vst Instrument Pack
Native Instruments Flair: Flips the classic head flanger effect. FLAIR adds a revolutionary new Voices mode that uses multiple delay lines to create custom harmonic flanger layers and resonances. It even has 24 chord settings, offering different chords and note intervals. In addition to revolutionary features, FLAIR is capable of rich tape saturation and pedal flanger, offering all the parameters you’d normally expect, such as tempo-synchronized pitch modulation.
Free Vst Effects Pack
Native Instruments Phasis: Offers endless phasing sounds – adding movement, soul, and creative magic to any signal. PHASIS takes inspiration from the classic phaser but adds powerful new features. For example, the Spread control changes the step spacing of a vocal style effect passage. Ultra Power Mode brings modulation to ultra-high speeds, creating unique FM-esque tones. The plugin adjusts the peak density and Q-factor of the slices in the spectrum and whether it is set to one value, applied in real time or with automation, or reversed with the “Invert” button, “Spread” provides a new effect for both the phasing process and vowel sounds of vocals. With its powerful stereo spread function, advanced sync options and all the controls, what you’d expect from a professional phaser, PHASIS is already a formidable modulation device, but the ULTRA parameter takes the effect to a new area of application. ULTRA boosts the maximum modulation rate from 8.37 kHz to an incredible 477.3 kHz, which generates unusual FM-style effects never heard before and is able to turn even white noise into immersive sound.
1 note
·
View note
Text
Muscle Building Tips - How Develop Muscle
TR1 Testo Boost Ingredients - https://tr1testoboost.com/. Do not go on any diet that instructs you to severely limit the level of nutrients and calories consumed. Even if you do lose weight while you're on one from the types of diets as soon as you return eating regularly you will gain each of the weight back. Example B: Warm up for 5 minutes. Sprint at approximately 80% of your maximum intensity for 45 to 90 seconds. Muscle Building Tips Contact a one or two minute repair. Repeat for 5-8 intervals. A good way to do these 3 exercises might be to alternate them i.e. Do 10 situps then do 10 pushups, then do 10 squats and repeat. You may find it hard at first but following a week of eating good nutrition and performing these exercises within your house then you will start figure out results.Just make sure to not give up.
youtube
When using weights, most guys have a knack for selecting the wrong workout sessions. Those tricep dumbbell kick-backs aren't going anything towards your triceps. The second kind great muscle pain is morrison a pardon onset muscle soarness. Right here is the pain that you simply feel upon your muscles a couple of days following out. Can be highly desirable and most desirable by body builders. It's the reason why bodybuilders take the elevator as opposed to the stairs after a heavy leg workout. If you have done some really intense leg workout then possibly know what I'm posting about. Your quads and other leg muscles are so sore that if you bend your knees it feels as if your main legs can potentially collapse. 3) A bench with incline adjustments - You'll need a good durable and stable common. This will let you perform bench press and other seated movements correctly. Softly you can purchase the adjustable bench so you've more safety using an incline position to your exercise. Protein may be the fuel for Muscle Building. During weightlifting and intensive training, muscle tissue breaks straight. In order to rebuild that tissue we really need to be on the high protein diet plan of action. If your goal is fat loss, a high protein dishes are also valuable. Most high protein diets are also low in carbohydrates and saturated weight. To accelerate weight loss, you must have to reduce carbohydrates and lower the calorie consumption. A high protein diet plan can help you to this should be done. The total number of protein consumed should be spread over 5 to meals the actual course to a day. And to accomplish this How to Build Muscle requires understanding this one fundamental truth, "it ain't rocket scientific discipline." Or maybe it is, however i know this; this is a reasonably straightforward idea. Moving with the exercise straight away usually world of retail we are swinging the weights as an alternative to using a slow controlled flow. Each repetition should take 4-6 seconds, observing this can give great gains and reduce the possibility of damage.
1 note
·
View note
Text
How I color poc in gifs
About a week a go, I got a request for a tutorial on how I color poc in gifs without whitewashing them. I finally got around to making it, and decided to show 2 different examples since not every scene is the same. Feel free to message me to ask about other types of scenes.
So, in this tutorial, you will see these examples:


PSA: this tutorial will be image heavy, and will probably contain lots of spelling/grammar mistakes since English isn’t my first language. You can always message me for more help in case it’s not 100% clear.
PSA #2: This tutorial is divided in 3 parts: the Tahani part, the Grace part and a general tips part at the end. You can use the search function to find any part you’re interested in.
Tutorial under the cut!
I want to start with saying that I definitely made mistakes myself when coloring poc and I learned a lot over time. I think the most important thing is that when coloring poc you should look at 2 things:
1. the original coloring: if a scene is really bright and the lighting is right in the character’s face, you won’t be able to bring back all of the color. If you do try, you might end up with really orange/red/yellow skintones.
2. A picture of the actor/actress in normal lighting: when you are working with yellow or blue scenes and aren’t sure what your coloring should work towards, just google the actor/actress to know what their skincolor should look like.
Okay that said, let’s start this tutorial!
A) Tahani from the Good Place
We are starting off with this gif (cropped and sharpened)

It’s a fairly light scene, so we’ll have to make sure to bring back color as we go on.
So to start off, I add a basic coloring that consist of 5 layers:

I add a curves layer to brighten up the whole gif and the levels to bring back some contrast/color. The black arrow will give your gif more color while darkening the shadows, which will help when trying not too whitewash your gif.
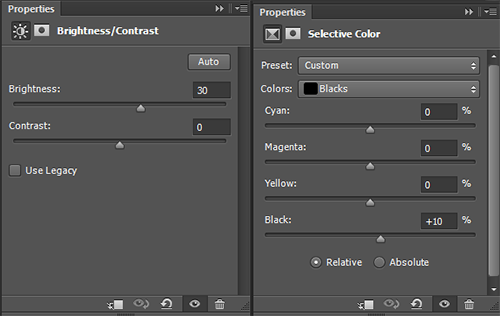
Be careful with brightness since it’ll take away some color from your gif.
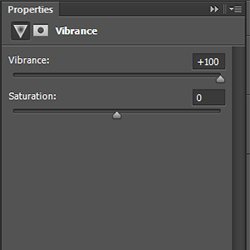
Which gives us this gif:

Which is honestly pretty good? The coloring so far didn’t take away too much of the colors in the gif already, but I think it could be a bit more red (not too much), so I put this layer UNDER the base:

It doesn’t make that much of a difference, but I like it:
You could leave it here, but I’m gonna add some other layers but that is optional!
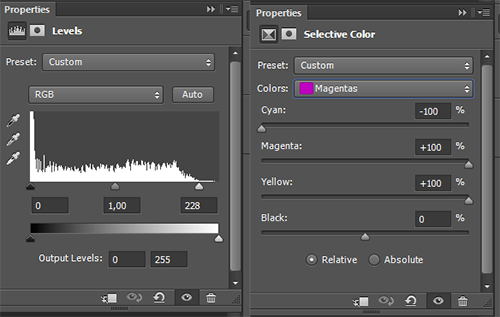
So first I added light levels, which brightens up the lightest parts of your gifs, without taking away the color (I love this layer so much!!!!). Then I added a selective color layer and changed the magentas (this is very much a preference layer, I like the lips to be more redpink and not pinkpink).
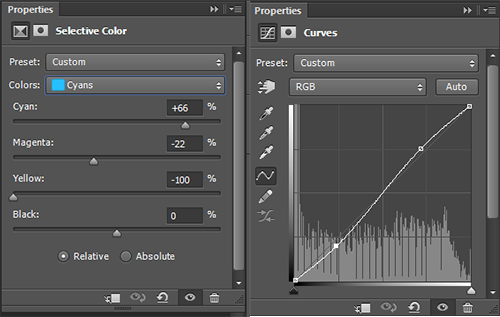
In the same selective color layer I changed the cyans to make them more vibrant. I also added more contrast with the curves layer.
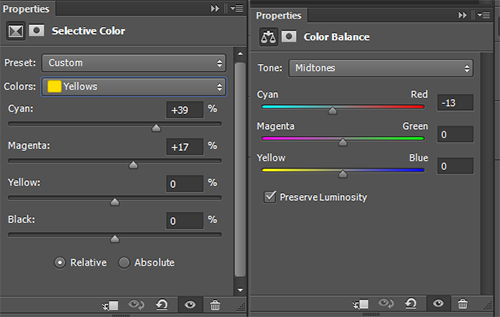
Then I changed the yellows to make then less ‘yellow’ (like in unnaturally yellow for a skintone) by upping the cyans and the magentas. This resulted in me thinking the gif was a bit too red, so I added a new color balance layer.
With all these layers, I ended up with this:

Now, I‘m happy with this, but I am going to give another tip when it comes to bright gifs: the white selective color.
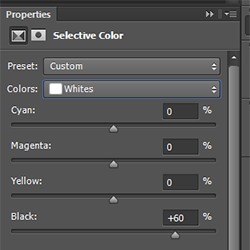
This does not make a big difference, so you cannot use it to fix the whitewashing in a gif. It will add some color back into the whitest parts of the gif. I almost never touch the cyan/magenta/yellow parts of this SC, because it can turn bad very easily :p. With this layer, you get this:

Which I think is a good end result. While the brightest parts of her face are too light, you cannot bring back enough color (in a coloring with high contrast) without making it yellow/orange. When there’s a lot of light on the face, try looking at the neck to see if you’ve whitewashed a gif or if it’s simply the lighting.
B) Grace in Black Lightning
So I chose this scene because it is very orange, so we’ll have to make it less vibrant without whitewashing Grace.
We start with this gif:
For this, I quickly googled Chantal Thuy (who plays Grace) and looked for a picture that wasn’t too heavily edited. I went with this one:

You can see she isn’t very dark (especially compared to the gif we have), but definitely has some color in her skin that we should maintain in the gif. It’s always better to go too dark than too light. With that in mind, I did these steps:
Again, I started with almost the exact same base as the gif of Tahani. I did not add a vibrance layer yet. I did add a color balance layer UNDER the base to make the gif less red:

This is what we end up with without adding vibrance:
The gif is way too yellow for me, so I added another color balance layer:


This looks way better imo. So now I add vibrance (only 50% this time)

This makes the gif slightly too yellow again, so I add another color balance layer:


Now I could’ve just not added a vibrance layer... but... I love my vibrance layers
I think this gif looks pretty good? It might still be a bit too vibrant when it comes to her skintone, but I like it. I did add some other layers to tweak the gif a bit, but these are optional:
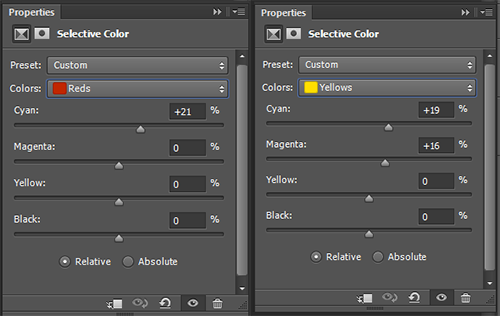
I did this to make the skin a little less yellow/orange, it’s not a huge difference though.

I added a levels layer to give the gif a bit more contrast

I would prefer this as my end result, because I like very colorful gifs, but if it is still too orang-y for you, you can add another color balance layer;
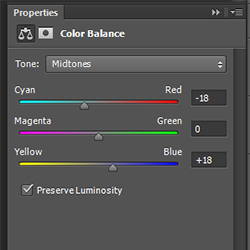

And then this would be the end result. The gif isn’t orange anymore, but Grace also doesn’t look white.
C) General tips
1. If you are coloring a gif, and you notice it is looking too white and don’t know what to do, check these layers first:
Levels: the middle arrow of the levels will heavily take away the color in your gif while brightening it up, so don’t use it or use it sparsely. The black arrow will add more color in the shadows of you gifs while darkening it a bit.
Red/Yellow selective color. With this layer you can massively change the undertones of the colors in your gif, but be careful! I usually use the yellow SC, and in that one I change the cyans, magentas and yellows. The cyans will change how vibrant the color looks, the magentas will make the gif more/less yellow (I usually go for less yellow by upping hte magentas), same with the yellows. I recommend to only use the yellow arrow when you cannot decrease the yellows enough with magentas.
Color balance: you can add a lot of color with this layer. Try to move around the layer in your psd, because different places will give different results. I usually add color with the yellow/red arrows, but the magenta can sometimes help (when your scene is too green and the red arrow makes it looks bad, you can add a little bit of magenta instead). If you are working with a red/yellow scene, you should use the blue/cyan arrows (as I did in the Grace example).
Vibrance: you can always add another vibrance layer on top of your psd to give the colors a boost. I wouldn’t recommend doing another 100% one though, since it will probably make your gif grainy and the skincolor way too vibrant. I don’t rec using the saturation part of the vibrance layer, since it’ll make the gif yellow rather than colorful.
2. If you aren’t sure, ask a friend! I do this all the time, because sometimes, after looking at your gif for half an hour, you have no clue what the hell you’re doing anymore and you need another pair of eyes.
3. Coloring takes practice. You are free to use the (unedited) gifs I posted in this tutorial to practice on.
4. While coloring your gif, put your adjustment layers in a group (select all and click on CTRL+G) and disable the group a few times while coloring so you can check if you’re not lightening the skin too much.
5. You don’t need to do all your adjustments in 1 layer, sometimes it’s better to add two levels layers instead of doing everything in 1, same with color balance and curves/brightness (especially the latter!). Curves and brightness can take away a lot of color when they are (one of) the first layers you use, so it’s better to generally brighten up the gif in the first layer, and add on more after your vibrance layers and color balance layers. (Sometimes I even put my vibrance layer under my psd, this mostly in very bright scenes)
6. The first adjustment layers of your psd do the most adjusting. Keep that in mind when adding color balance and vibrance layers. Adding a vibrance layer under everything else will make the gif a lot more vibrant in a different way than it would putting the vibrance layer above everything. If your gif is very light and you can’t seem to bring back coloring, I suggest putting your vibrance layer under all your other layers, it might help.
You won’t be able to bring back color in every gif. The important thing is that you don’t take it away by brightening too much (or with the wrong layers), taking away the yellow/reds or adding a b&w gradient / layer.
#itsphotoshop#completeresources#yeahps#gif tutorial#tutorial#my tutorial#sorry this is so late anon#i drafted this and then somehow forgot?#anyway I hope this is helpful
480 notes
·
View notes
Note
Any chance of you doing a tutorial on how you color? Like your latest Raven set for instance, it’s so gorgeous
I’m not quite sure how specific you wanted this so I’m just gonna go through my usual ‘routine’ below
though really, I will say that colouring is just a lot of trial and error, so you just gotta get into photoshop and fiddle. and if you’re like a real beginner, what was most useful for me when i was learning how to colour years ago was downloading every psd i liked and going through the filters, turning them on and off, adjusting things, etc. to learn what effect each one had and how they worked together (the Essentials™ are Colour Balance, Curves, and Selective Colour)
anyway basic colouring tutorial:
step one: base
so you gotta have your gif made and sharpened before colouring, i’m gonna use this one (because I was working on it when i got your ask lmao)

and the first thing i’m gonna do is add what i call a base colour (i’m sure plenty of other people do too). I have a recurring psd I usually use as a base, but it’s pretty simple to replicate so i’m just gonna do that instead and add two Colour Balance layers
in the first I’m going to use Shadows and set the Red +1, Green +1, and Blue +2

and in the second i’ll use Highlights and set it to Red +8, Magenta -4, Yellow -11, and I also like to put my filters in a group now (name it something obvious, like base)
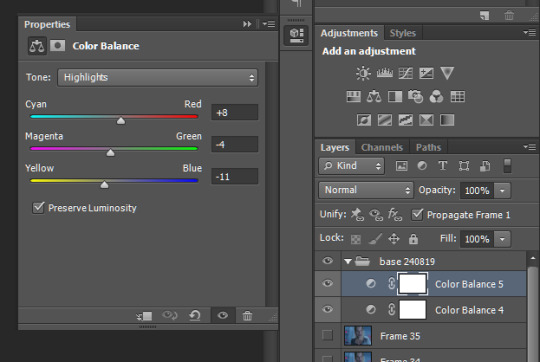
you can use both highlights and shadows in the same layer but I like to keep them seperate in case i edit them later (also why I’ve coloured the layers in grey, differentiate ya know)
my gif now looks like this:

after Colour Balance comes Curves and Brightness/Contrast
TIP: don’t try and do everything on one layer, use more layers and move incrementally, it’s harder to edit later and it typically won’t look as good, i’m not really sure why but you tend to lose qualilty when you try to make big changes all in one (see: hue and saturation layers)
so i’ll add a Curves, then a Brightness/Contrast, then another Curves:

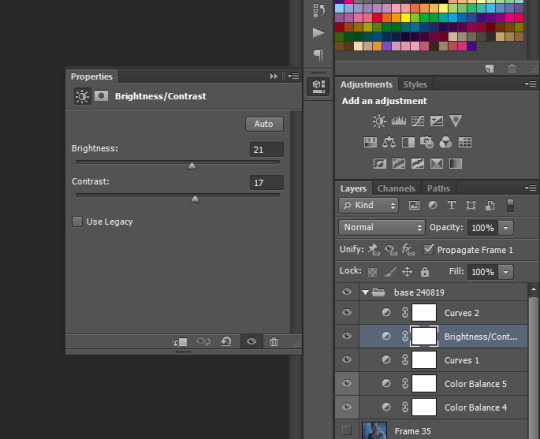
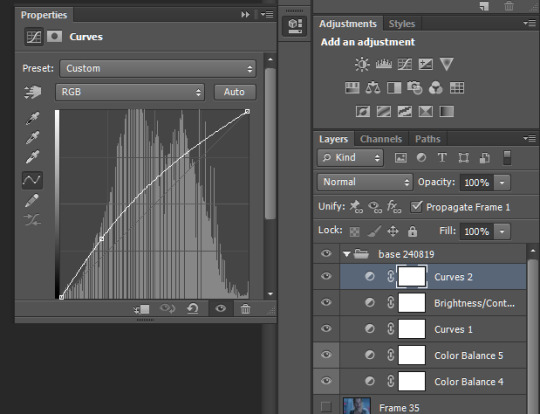
and now I have:
then I move onto Selective Colour, I use two Selective Colour layers here, though the first is situational as it relates to skin tone, so it’s not gonna do much for this gif, but if i’m editing with, say, Raven in it, it becomes necessary so that I can avoid accidentally whitewashing her/Lindsey

I’ve highlighted this layer in red so I know where to find it quickly because i’ll occasionally need to increase the Magenta or Yellow
and for the second layer
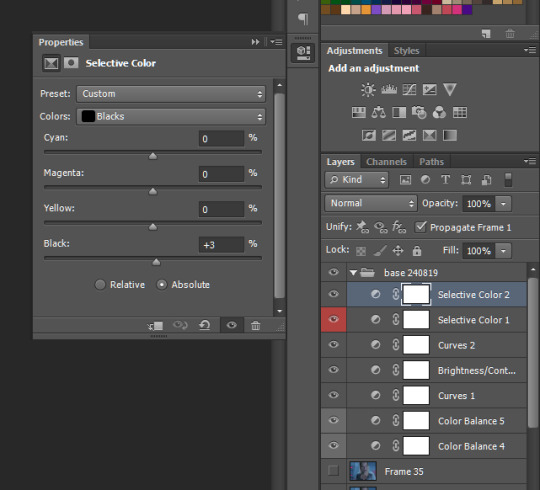
which gives us:

then finally I’ll add another curves layer on top, this is another Optional™ layer, aka I’ll use it if a scene is darker but turn it off otherwise
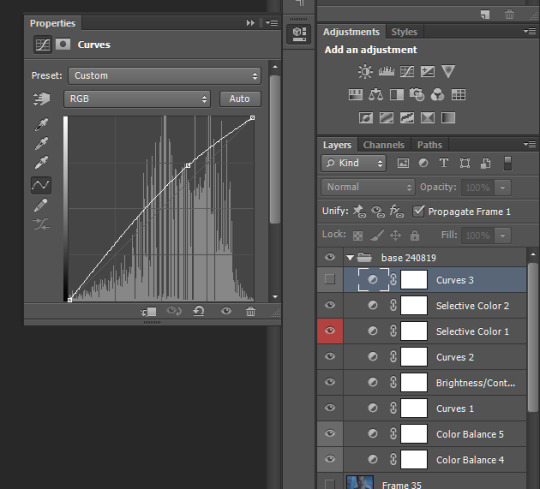
since i don’t need it for this gif i’m leaving it off, and that’s the base done
step two: the Colour Proper
so… basically use selective colour over and over again. I want to make this gifset really blue so first i’m just going to increase the blue itself with a few selective colour layers
TIP: put your selective colour layers under the base, that way the base’s filters will apply to these ones as well
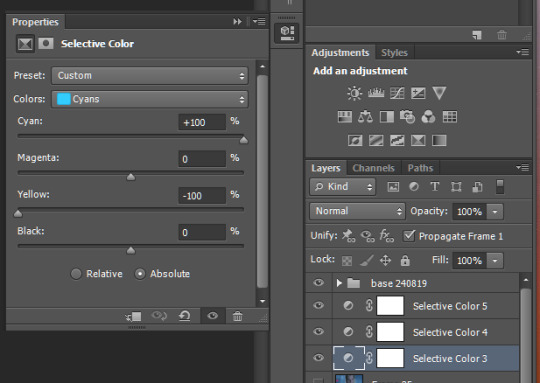
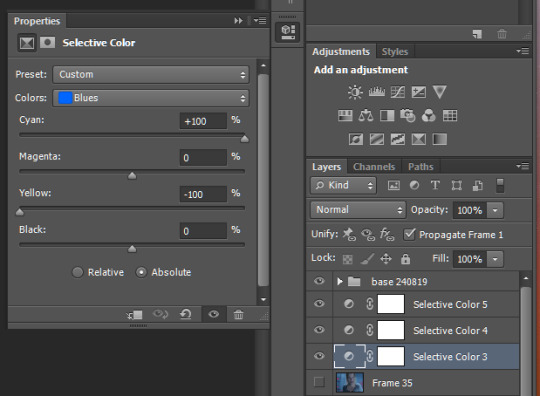
with just one layer i get
and then with all three i made
but with the third the blue has started to bleed into the skin tone, which is where you really have to start just playing around with things. I can use a layer mask to correct it, but that’s harder on gifs with more movement
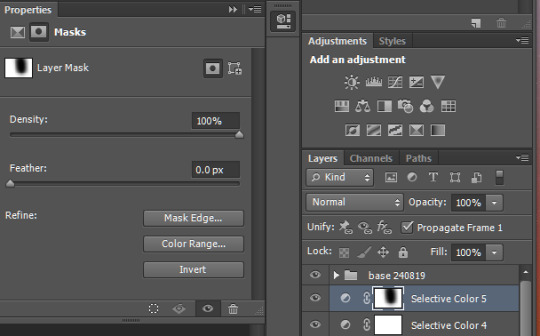

still looks alright though
or i’ll put a midtones layer underneath my selective colours and increase the midtones reds and yellows, though it’s worth testing the highlights too

and i get

which way to go really just depends on what look you prefer/are going for in your gifset, or in this case, i’m gonna do both
so if i just wanted to make a mostly cyan gif, i’d probably just leave it here, but say i wanted dark blue. my first three selective colour layers are just there to boost the existing colour, but now i’m actively trying to change the colours
so first i’d put a selective colour above the base
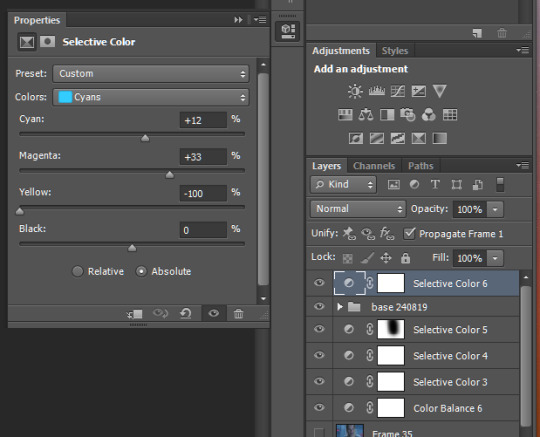

and it looks like this
if i put the new selective colour below the base it’ll look like this

which, ya know personal style but the cyan is still apparent in the lower one because all the colours below the base are effected by it, ergo, they’re made lighter
and then, say i wanted to make it green instead: i know some people like the hue/saturation filter but i personally don’t really like using it cause it ends up looking more pixellated, so once again i’m just gonna use selective colour and in the cyan and blue colours set the yellows to +100
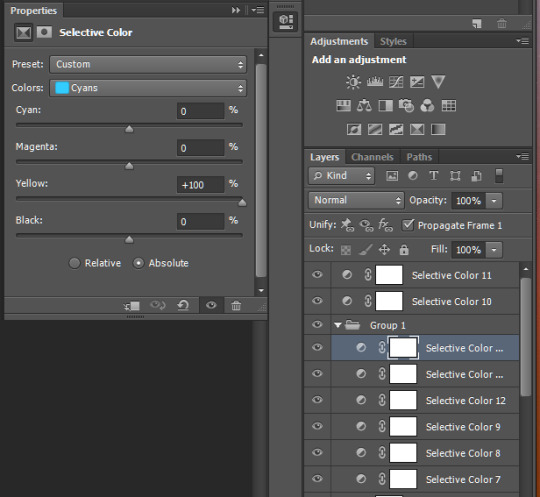
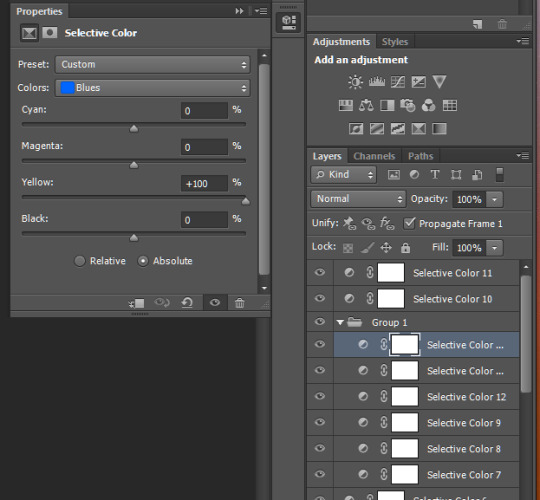
then just repeat until there’s no blue left

and then i’d go in with a few selective colours in green to make it the actual shade i want


and then its just smaller touch ups, like that red patch on the right, so i’ll go back under the base (and turn it and all other layers above it off) and create a new layer, then use the dropper tool to get the colour of the background

then paint over it, usually with a soft brush on like 40% opacity, then set to darken (though that depends on the gif, so try the other settings like lighten too, jic)
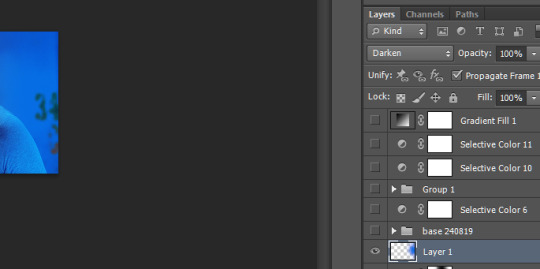
then turn all the other layers back on and
boom ugly red spot gone
i could also do more touch ups with layer masks and all for the green that’s bled into the face we already went over that
and really the only other thing i might do is add a b&w gradient, set it to like 30% opacity and soft light, but that really depends on the Look™ i’m going for ya know
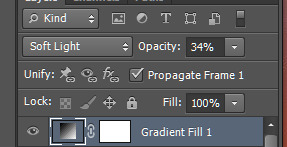

and yeah that’s it
#all the tutorials i've made before have been for more specific stuff so lemme know if there's something else you wanted#long post tw#tutorial#colouring tutorial#answered#anonymous#can u tell i took like 3 hours in between making this
8 notes
·
View notes
Text
Divisiveness in Rage 2
What little promotional material there was for Rage 2 interested me. The idea of a nitro-fueled FPS surrounding an open world and a heavy power fantasy. I wasn’t expecting an enthralling story with deep and rich characters that would stitch me into the fabric of the world created. I was expecting a rip-roaring hail of bullets in the shape of a gun the likes of which I would ride across the map destroying everything that did so much as exhale in my presence. In short, that is what I got but it’s quite mixed. The “boots on the ground” combat, and I use that term lightly, is smooth as hell and lets you the player take on the various mobs and gangs of the wasteland in the way you want. The vehicular combat is more sparse and anecdotal in the sense that they are typically randomly occurring events as opposed to the convoy routes. The world itself is big but not Horizon Zero Dawn or Assassin’s Creed Odyssey “oh my god how did they even fit all this on one disc” big, it’s more than manageable. The biomes are varied and impressive in detail despite some being more vacant than I’d like. All in all, it’s at the very least better than the bland world of Rage 1, and at best it’s a gorgeous backdrop for the best FPS action since Doom 2016.
Anger Surrounds
There isn’t a lot in the way of introduction and it’s cause the game and it’s creators understand what you’re here for: shooty bang. You literally pick a gender and are handed a gun. After the first big firefight, the world is literally open to you. This exploration is encouraged because you don’t gain abilities or weapons unless you find Arks which are silos scattered around the map. Normally I’d be mad about another icon cluttering the map but it’s at least a way of getting stronger while discovering the hovels and holes your enemies hide in, grabbing some cash and feltrite (upgrade currency) along the way. It’s essentially the best version of the Far Cry towers ever.
The world is very pretty both graphically and from an art direction aspect. Boggy swamps, desert, rocky canyons, and even suburbia is sprinkled into the colorful and sometimes striking scenery of the world around you. Some structures are established like roadblocks, resource stations, or mutant nests, some are just dressing to fill out the world, but the best is the elaborate gang camps that go from close quarters combat to open courtyards that have you working with cover and elevation. Most main and side mission areas appear to be carefully designed to be engaging set pieces that vary from open lots littered with obstacles to break up the battlefield and enhance the functionality of some abilities. If the map itself doesn’t grab you, the way the world is designed to make combat as fun as possible definitely will.
Walker Wasteland Ranger tonight at 9
Rage 1 very much gave you the feeling of having your back against the wall. In Rage 2 if you ever find yourself in that situation you push off that wall and crush whatever is in your way into misy and gristle. You are the baddest thing breathing and everything in this game is about making you feel that. I can’t tell if the progression is deep or cleverly padded and that might be fine by me, I haven’t decided yet. When you first see how many currencies there are in the game it makes anyone that knows what AAA games have been doing lately sweat profusely. Fortunately, Rage 2 gives you plenty of opportunities to load up on the kind of cash you spend in stores, the kind on upgrades, weapon skins and mods, it's all here for you to take when you want it you just have to kill a bunch of baddies to get it. Thankfully there isn’t a single gun that doesn’t feel incredible and unique. From the way the rifle spits a volley or the kick from the shotgun; all of them are a dream and when used in tandem with the abilities it makes for very enticing gameplay. The abilities span all aspects of combat and their refresh time doesn’t allow them to be spammed but lets a player that bounces from skill to skill always have one refresh by the time the effect of the current one wears off. They really found a way for the guns to play into abilities and vice-versa which only makes spicing up combat easier. In Destiny when you throw a grenade, that’s it. Did you use your melee? Oh that’s cool but, that’s also it. In Rage 2 I can mix up abilities to create different means of destruction and death in a much more satisfying way. Even the more nuanced abilities like the Rush and Focus are used to bolster the minimal downtime firefights give you.
From McQueen to Mater
The sixteen vehicles are divisive stars of Rage 2 and it really shows, alongside the facelifted combat, that Id and Avalanche tried to not lose sight of what the original game was focussed around. This rendition’s vehicular combat is much better with weighty pit maneuvers and pretty smart auto tracking from turrets. Alongside this, the vehicles simply must be redone Mad Max vehicles Avalanche never got to use or something cause they just work in a way Bethesda hasn’t been able to claim in a long time. The Phoenix, your signature ride, is the best of both worlds with it being quick and tanky with a litany of additions you can make to it. You’ll see vehicles that have no weapons (why would you even), some speedsters that drop nuke mines behind them, a tank that is slower than frozen shit but also practically indestructible and armed to the teeth. There is fast travel but there is also the Icarus which is a hoverbike and though it can handle like a shopping cart with one wing (more on that later). When it does work its nice to get to where you’re going quicker meanwhile not missing out on any points of interest along the way to where you’re going. Vehicular combat is serviceable and engaging once you get the controls under your fingers.
rAGED
I don’t have too many issues with this game, some are typical nitpicks but others are definitely more egregious. The world though colorful and varied is very “basic open world game” format, I was kind of hoping for some kind of expansion on a version of game we are wildly overly saturated with. The mini games like MobTV and races (which make a comeback from the original) are great but the typical icon littered map is a little draining at times. Which brings me to the endgame because with consideration of just how last gen this game seems to be design wise, I fear they didn’t think about something as “modern” as having an endgame model outside of the season pass and totally unnecessary “live service” content drops. I feel like they missed their own mark and could’ve really populated the world with quite a few more enemies but instead, there are a lot of times where it’s actually quite isolated even in some intriguing areas.
Oh, and every situation that yields dialogue in the open world is wildly repetitive like the writers could not be fucked to give the character anything more than the one decent line you get to hear when approaching a mutant nest, gas station, or bandit hideout or the mobile trader oh my god it’s absolutely torturous especially when you don’t feel like returning to a town and they typically come around fairly consistently.
Back to the Icarus flying bike thing. Mother Fuck that thing can be absolutely unbearable. You see the right trigger merely starts the engines with minor altitude control, the left trigger lowers yourself. The vehicle is supposed to identify altitude and the height of oncoming structures and mountain faces on its own and adjust automatically. But it doesn’t and you’re often sitting there like a fucking idiot ramming into every mountain and building you come across. Why didn’t they map an ascend and descend control to the face buttons? How did no one catch how lopsided that thing controls?
Let’s continue to discuss vehicles, shall we? I talked about the good of the actual combat and the weapons it comes with. What I didn’t talk about was how the controls for said vehicles go from tight and responsive to sludgey and “too fast for the game”. It’s like the vehicle is going too fast for your controller. So many times I’ve gone sailing over the cliffside curve or undercutting and completely killing my momentum. The margin for error is really thin.
The progression system for weapons is...suspect. On the surface, it’s deep, you unlock tiers of upgrades with feltrite and then use upgrade/mod tokens to select the actual mod itself. It seems really unnecessary to have to purchase the ability to spend your tokens to upgrade your weapon. Just typing that made my brain fuzzy, it’s too many steps. At least with the skills each tier in itself comes with a boost to that specific skill but with weapons, you’re literally just adding steps for now real reason. Thankfully there’s no connection to monetization or anything like that. What it does have though is a premium currency for weapon skins which....whoopie...but thankfully that really is the extent of it. Not that it’s okay at all.
Conclusion
People are gonna compare this game to Far Cry New Dawn and I don’t believe many should give too much thought to that comparison. Outside of the bright post-apocalyptic setting (an aesthetic Rage 2 established first for the record), I feel like Rage 2 is more consistent in what it sets out to deliver. Not to mention the combat is just head and shoulders better in Rage 2 and if you go in knowing you won’t leave with a story that changed your life or even really impact you at all but instead expect a white knuckle shooter designed to keep you on your toes and keep the kill count increasing. This game is fun and once this goes on sale there will literally be no excuse.
tl;dr I give Rage 2 an 7 but I can’t stress this enough this is one of the best First Person Shooters I’ve ever played from a mechanics standpoint. The game appears to be this good despite the rest of the game design and execution.
4 notes
·
View notes
Text
How to Recover Like an Elite Athlete – 5 Recovery Devices That You Can Use Today
Athletes will try anything to get an edge on the competition. And in a flash. Their interest in any recovery device can spark a trend for the masses. Because we all know that if we used the same recovery devices. Then we would all be superstars in our own minds. Luckily for us. These recovery devices get more and more accessible every day. Check out 5 of the more interesting options creeping up from behind the scenes. 1 – Cryotherapy or Cryogenic Chamber Therapy – Found at selected spas, gyms and health centers across the USA. Check your area for a trial session that typically costs between $50-100. Frigid air blast your whole body during treatment inside a liquid nitrogen gas chamber. Inside the chamber the air temperature plunges to between -180°F to -250°F. This results in a drop of a person’s skin surface temperature to 30-50°F. Your treatment last for roughly 2-3 minutes. And this helps the body promote healing and release endorphins after exercise. The Dallas Mavericks believed it gave them a key edge during their 2011 championship run. And many athletes swear that the endorphins it promotes after a tough workout help them bounce back the next day. If you got the time, money and a location near you. Then Google will provide you with some options. 2 – Sequential air compression devices – Both legs rest inside giant boots. Divided into multiple chambers from the foot to the upper thigh. A generator pump fills chambers with air applying intermittent pressure to different sections of the leg. With the goal of applying pressure to the foot area. And gradually moving pressure up the leg towards the heart to help cycle blood and promote recovery. You can get your fix with NormaTec Recovery Systems or Recovery Pump Boots for approximately $500. Used by basketball athletes like: Kevin Garnett, Shaquille O’Neal, Ray Allen, Blake Griffin and Steve Nash. And used by football athletes like: Larry Legend aka Fitzgerald, Vernon Davis and Patrick Willis. Now available, a version for your arms, shoulders and chest. So if you weightlifters, pitchers or swimmers got $350 to spare. Then you got yourself a new recovery tool. 3 – Altitude chambers – Ideal for endurance athletes. And used to help increase your red blood cell count which boost your blood’s oxygen carrying capacity. An altitude chamber replicates living in high altitude elevations. Higher elevations cause you to breathe less oxygen compared to sea level. And your body responds to the shortage of oxygen available in high altitude environments. By enhancing its ability to carry oxygen throughout your body. In the end, your body benefits with a slight endurance boost when you train at lower elevations. Live high, train low. Hypoxico and AltiPower, two of the established brands for altitude chambers. Their units work by adding more nitrogen to the air. Which results in a lower percentage of oxygen consumed per breath. Their units get pricey to buy, but you can rent one for roughly $175 per week. Unfortunately, the rental comes with a four week minimum. And up to 8 payments can go towards the overall cost of purchase. You want to use their units when you sleep, and also for any daily leisure activities. They also make a portable mask unit that you can use with stationary bikes, treadmills and other stationary activities. If you plan on using an altitude training system. Then you may also want to purchase a pulse oximeter for safety reasons. This will allow you to monitor and measure your blood oxygen saturation percentage (SaO2%) and heart rate. If you purchase a pulse oximeter from Amazon Marketplace, make sure you get an adult sized one. Or it might not fit upon arrival. And do beware of the elevation training masks available on Amazon Marketplace and other places. Armed with a misleading name. These mask only restrict the amount of air you inhale. So you breathe less air, but you still end up breathing in your normal amount of oxygen per breath. Therefore, they will not help increase your red blood cell count or lower your blood oxygen saturation percentage (SaO2%) when using them. What do these elevation training masks do? These elevation training mask help you to train and strengthen your diaphragm muscles. By forcing you to draw deeper breaths. When you constantly take in deeper breaths during your workouts. You train yourself on how to take in a larger volume of air with greater ease. You can get your own elevation training mask for roughly $80. Filed in the I need one of those category. Tennis star, Novak Djokovic, uses a CVAC Pod. An egg-shaped, bobsled-sized pressurized chamber. Djokovic goes on to state to The Wall Street Journal, “I think it really helps – not with muscle but more with recovery after an exhausting set.” With the CVAC Pod, you can adjust the pressure, temperature and air density inside the pod. I guess it’s safe to say that if we used one of these, then we would all be superstars. 4 – Electric muscle stimulators (EMS) – With the skepticism of those six pack ab belts still fresh in our minds. It’s finally time to move on and stop associating those self proclaimed no exercise required ab belts with other EMS devices. EMS devices can help you recover from your workouts or from injury. Luckily, active recovery from your workout only requires a low-voltage EMS device. You will find that using EMS in a pulsing mode for 10-20 minutes after your workout. Will stimulate circulation when used at a very low intensity. Thus cheaper devices meet the electric currency requirements of active recovery. And you can find lots of options that fall into the $90-$215 price range when searching for EMS or TENS devices on-line. However, if you want a quality device that can do it all. You’ll need an EMS device with enough juice to maximize fast twitch muscle fiber recruitment, increase muscle strength, increase muscle mass, aid recovery and prevent muscle atrophy. Then you will need to pony up the cash for a high grade EMS unit. Which will fall in the $500-$900 range. Compex and Globus, two of the top end brands in the EMS market. If you plan to own a top end EMS device. Then you will want to work the EMS device into your routine after your workouts or on off days as a strength training supplement. Just make sure to crank the unit up to high voltage after your initial warm up to receive the full benefits of the EMS device. 5 – Compression garments – A bit of a cop out, but surprisingly scientifically sound for recovery. What started as Allen Iverson’s shooting sleeve morphed into 1,195 product results on Amazon Marketplace. Typically worn during workouts because they feel good and after workouts to enhance recovery. If you want to wear them during your athletic activities, then look for a compression level between 15-20 mmHG. Graduated compression garments provide maximum pressure at the wrist or ankle area. The pressure lessens as you move up the arm or leg. With the goal of pushing the blood furthest from the heart towards it. Wear your graduated and medical grade compression garments for 2-3 hours after your training session to help recover. And this doesn’t even cover other athletic recovery tools. Such as palm cooling devices to recover on your rest intervals, and allow for increased arm muscle activity and strength. Cooling vest to recover against the heat, and enhance your overall endurance in hot environments. Zero gravity treadmills to help with injury recovery; check Google for options in your area. And lastly, hyperoxic recovery during workouts, on rest intervals or post-workout via the use of an oxygen mask or oxygen cans to supply yourself with a dosage of pure oxygen. Go sign up at http://allnaturalped.com/ to discover other recovery devices that creep up from behind the scenes. Then get ready to brush that superstar shine off your shoulders.
from WordPress http://bit.ly/2IW01nr via IFTTT
1 note
·
View note
Text
The Truth About The Banana Diet Revealed - With as Well As Warning

1) I can't stress get it done enough. Drink WATER, WATER, WATER, and even more WATER! Drink approximately half your weight in water in ounces each day. (ex: If you weigh 150 pounds you must drink 75 ounces water a day). Your water should be bottled or filtered filtered water. Broccoli and cauliflower are some of the cruciferous vegetables that have natural phytochemicals that will help reduce threat of some cancers. Other cruciferous vegetables include brussels sprouts, cabbage, kale and bok choy. Broccoli and cauliflower are high in vitamin C. Broccoli is a good source of vitamin A good solid. They have fiber and are naturally short of fat, calories and do not contain bad cholesterol. This will be the main reasons why this weight loss program is that effective. It targets your metabolism rate as the principle of most weight problems, instead of simply lowering the calorie content. The brain is made from 30% of DHA omega 3 acid saturated fats. This is why a DHA supplemented child can have better cognitive functions and much better focus. original site Focus and concentration is important because could indicative of a real more intelligent child, who's likely try out better at high school. They may also be capable of maintaining a larger vocabulary. No Permanent Weight Loss if not Continued. I recognized that when I stopped following the fat Loss 4 Idiots diet and attempt to enter around my previous "routine" again, my weight begun to increase therefore. Therefore, even though this diet plan plan does work and anybody who used it really lose weight, is not additional a temporary solution a person are don't adjust your lifestyle after dropping the lbs. Anyway, after that great diet and adopting into the new eating habits, you'll recognize how easy end up being to continue with this diet and if possible do it almost almost instantly. Claim of Losing 9lbs in 11 days is reasonably difficult accomplish (if not impossible). Diet regime claims that one will be able to lose at least 9lbs in 11 a short. Many people might be attracted by the dpi whilst others will be alerted that sounds dubiously. http://www.stockhouse.com/members/bigmajkibut158 The fat loss success depends basically while on the consequent making use of the diet plan, the reduction of daily calories and also physical techniques. https://www.intensedebate.com/people/tyylerfear152 These Omega-3 supplements are also used allow pregnant as well as their fetuses. They perform this by and helps to build the youngsters cerebral cortex. This cortex is created of twenty per cent DHA it can be tied to your baby's Intelligence quotient. This oil also assists to boost your child's immune system, helping cease allergies together with other nasties doing the fits. Before you set up a diet program to help lose weight, you must always consult doctor or an authorized nutritionist. However, one pretty important regarding advice that they're going to give you is evade trans fats and solutions that contain high fructose corn syrup. And being rather unhealthy, this procedure will in order to eliminate many unhealthy diet right back. Although it does require an individual become more selective as foods you actually consume, rrt's going to ultimately help you.
1 note
·
View note